


Real estate photography plays a pivotal role in the buying and selling process, acting as the first point of contact between the property and a potential buyer. In fact, 83% of buyers said pictures are very important in helping them choose which homes they will visit.
For real estate photographers, capturing the beauty and essence of a property is more than just taking pictures—it’s about telling a story and making the space feel warm and inviting. However, even the best shots can benefit from a touch of editing to truly make them stand out.
In this guide, we’ll show you 5+ super simple real estate photo editing techniques to help elevate your photography game and ensure your listings capture and retain viewer interest.
Let’s get started!
5+ Super Simple Real Estate Photo Editing Techniques
Here are 5+ super simple yet powerful real estate photo editing techniques that will take your images from dull to captivating.
1. Brightness and Contrast Adjustments
One of the most straightforward yet impactful tweaks you can make to your real estate photos is adjusting the brightness and contrast levels.


Brightening a photo can help eliminate shadows and darkness, often making a space appear smaller and less inviting.
On the other hand, tweaking the contrast can add depth to your images, making them pop and giving a more defined look to the property’s features.
To learn how to make your images bright and inviting, check out this tutorial video on how to brighten a photo in Photoshop:
2. Color Cast Correction for a Natural Look
Color casts can significantly affect the way your photos are perceived. It’s considered an eyesore.


Artificial lighting and reflections can introduce unwanted colors into your photos, making spaces look less appealing.
By utilizing the color correction tools available in most photo editing software, you can neutralize these tones to reflect the property’s true colors.
This step ensures that potential buyers are seeing the space as accurately as possible.
To learn more, check out our video tutorial on how to easily remove color cast from real estate images in Photoshop:
3. Straightening and Cropping for Perfect Image Composition
Even a slight misalignment in your photo can throw off the entire composition, making the property appear skewed or tilted.
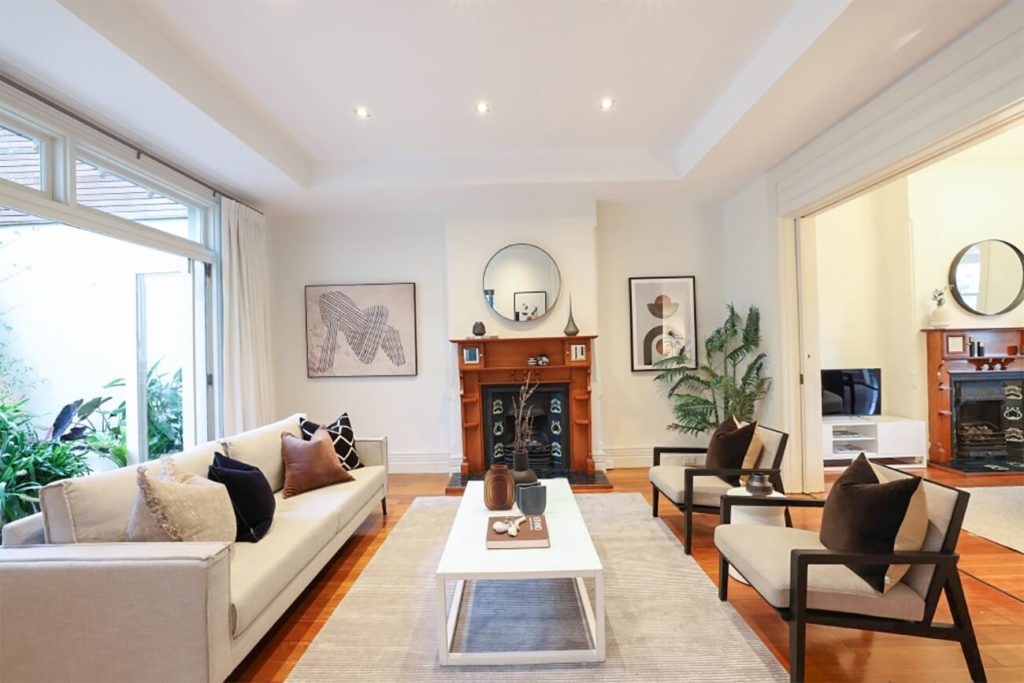
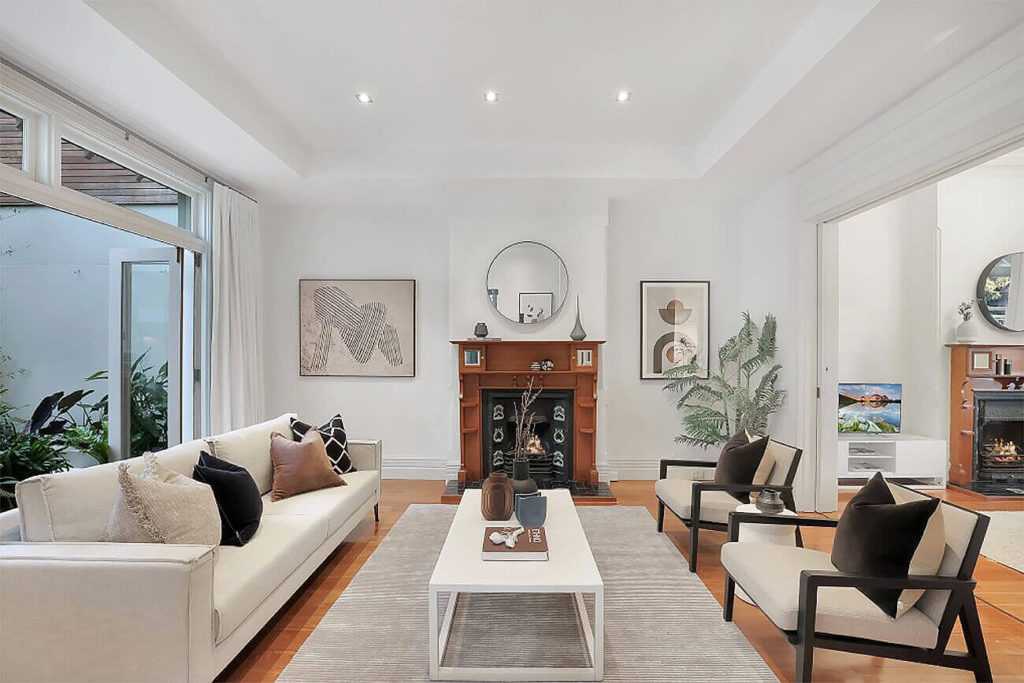
Making sure your verticals and horizontals are straight is crucial in real estate photography.
This sometimes overlooked real estate photo editing technique can dramatically enhance the overall appeal of your shots.
To see how to align verticals, you can check out our video tutorial on how to straighten verticals in Photoshop:
Additionally, cropping can be used to remove distracting elements from the edges of a picture, focusing the viewer’s attention on the property.
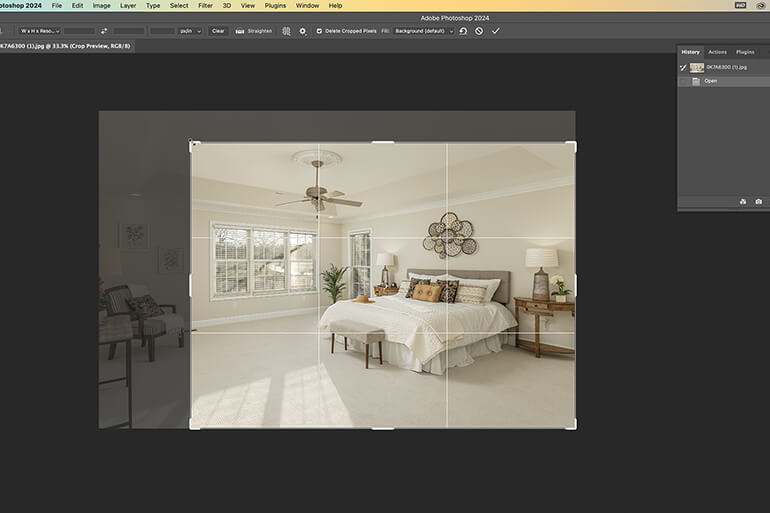
How to Crop Images in Photoshop
It’s super simple! This is how to crop your images in Photoshop:
Step 1. To begin, press the C key to open the Crop Tool, or click on the Crop symbol in the left menu.
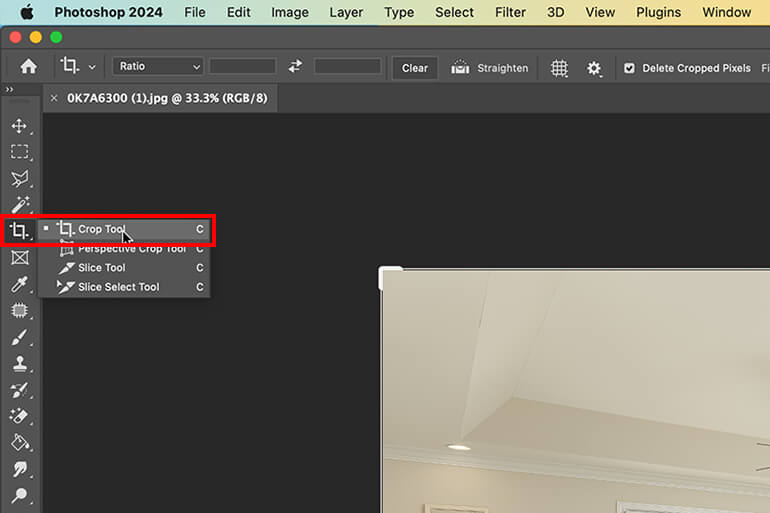
Step 2. Next, go to the Drop-Down menu next to the Tool Options panel and select W x H x Resolution instead of Original Ratio. This will allow you to adjust the crop setting.
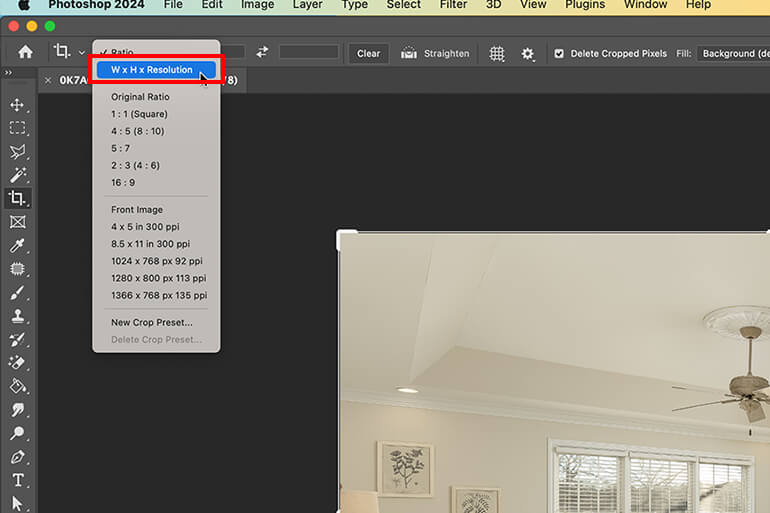
Step 3. Now comes the fun part – making precise adjustments through cropping. Start by Clicking and Dragging the tool over the portion of the picture you want to keep. If needed, you can continue dragging to fine-tune the selection from different sides.
Step 4. Once you’re satisfied with the new dimensions, you have two options. Either Double-Click the Cropped Section or click the green Commit current crop operation button to apply the changes.
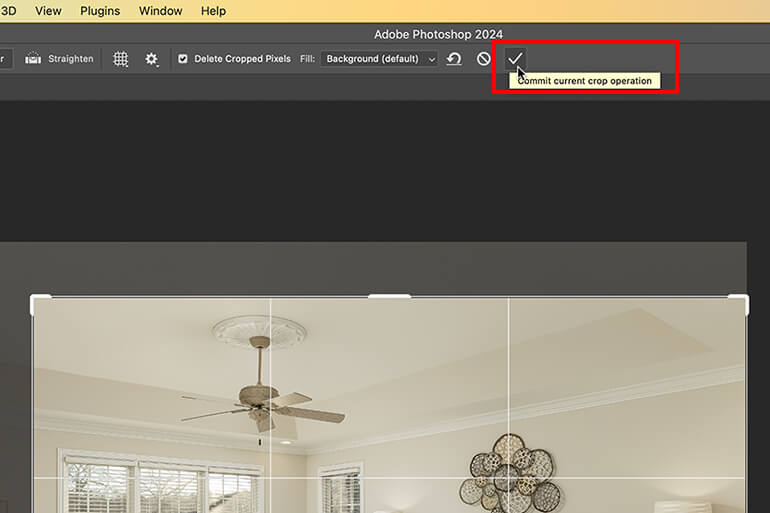
If you change your mind or want to start over, simply press the Esc key or click the red Cancel button to cancel the crop selection.
Cropping pictures in Photoshop has never been easier. Give it a try and watch your images scale without any distortion.
Have You Ever Thought To
Outsource Photo Editing?
Try it today with 10 free edits from three professional photo editors.

4. Highlight and Shadow Recovery to Reveal Details in Your Photos
Properties often have areas of extreme brightness or darkness, making it challenging to capture details in those regions.


With highlight and shadow recovery, you can bring back details lost in overly bright windows or underexposed corners.
You can use Lightroom or Photoshop to adjust shadows, highlights, whites, and blacks. In our video tutorial below, we are showing you how to remove shadows in Lightroom:
5. Removing Unwanted Objects
More often than not, real estate photography includes unwanted objects that you need to remove to clean up the image.


For example, some common situations where you may want to remove an object are:
- There’s a car in the driveway, blocking the wonderful view of the garden
- The TV cords show and make the image appear cluttered
- The granite counter would have been perfect if not for that old frying pan that was overlooked during the shoot
- There’s an ugly crack in the bathtub, or the wallpaper is coming off in the kitchen
- You failed to notice that someone passed by the property while making the shot
But don’t worry because these can be edited in Photoshop by using the Clone Stamp Tool. Watch this video tutorial on how to remove cords in Photoshop:
6. Adding and Enhancing Visual Elements
Sometimes, the smallest edits can make the biggest difference. Adding a fire to fireplaces or turning on TV screens can make a property feel lived-in and cozy.


To learn how to do this powerful edit, check out this video on how to add fire to the fireplace using Photoshop:
Conversely, removing items like cars in the driveway or personal items can help potential buyers better envision themselves in the space.
This video walks you through how to remove a car from the driveway:
These subtle edits can significantly affect the photo’s feeling and the property’s perceived value!
Effective real estate photo editing doesn’t require overly complex techniques or extensive manipulation.
By mastering these 6 simple yet powerful editing strategies, you can significantly improve the quality of your real estate photos, making your listings more attractive to potential buyers.
High-Quality & Consistent
Real Estate Photo Editing
Hire a dedicated editor with performance metrics from $7/hour.
You Don’t Have to Do It Yourself – Leave the Editing to PhotoUp!
If post-processing feels frustrating and takes away valuable time from doing what you love—shooting more properties—delegating the editing workload to PhotoUp can be a game-changer!


With PhotoUp, you gain an expert partner eager to assist you in producing high-quality, natural-looking real estate photos, saving you time and enabling you to engage more clients.
Based in the US and with additional offices in the Philippines, we offer a full range of services to cater to all your photo editing needs, including:
- Brightness and color correction
- Vertical lines adjustments
- Advanced object removal
- Day-to-dusk conversion and Twilight editing
- Lawn greening and sky replacements
- HDR editing
- Manual blending
- Flambient editing
- And much more!
PhotoUp’s team of editors can handle any editing job — big or small, complex, or simple.
Browse Top Dedicated
Real Estate Photo Editors
Ready-to-hire editors for real estate photo editing, and more.
Plus, our pricing is also affordable, with most photo editing services starting at only $1.10 per image depending on your subscription.
Dedicated Photo Editing
We also offer dedicated photo editing services. A dedicated editor learns your style and approach and provides consistency while improving turnaround times.
You’ll also be surprised at how dedicated photo editing can save you money.
Consider this – on average, a dedicated editor outputs 1,800+ edits per month, at a final cost of $0.72 per edit. We have even seen $0.50 per edit.
Working with a dedicated photo editor is not only affordable, but it will save you countless hours while also boosting your image quality!
Hiring a PhotoUp Dedicated Photo Editor
For more details, you can check out our hiring a PhotoUp dedicated editor video:
It’s really that easy to get started with a dedicated editor!
A Complete Real Estate Marketing Service


PhotoUp does much more than just real estate photo editing. We are a complete real estate marketing service and also offer powerful marketing tools such as:
- Virtual staging
- Virtual house tours
- Single property websites
- Real estate photographer websites
- Property flyers
- Floor plans
- Video editing
- Virtual Assistants
- House portraits
- And more!
We have everything you need to enhance and market real estate photography in one user-friendly software!
So, take the next step, and take your real estate photography to the next level.
Sign up for a free PhotoUp account today, and give PhotoUp’s professional real estate photo editing service a try! For a limited time, we even offer 10 free edits when you sign up for an account.
We hope this guide helped you learn 6 simple real estate photo editing techniques to perfect your images and captivate viewers. If you found this blog post useful, you may also want to check out some related resources:

