


Table of Contents
- Why Is Real Estate Photo Editing Crucial in Today’s Market?
- Top 18 Real Estate Photography Editing Tips for 2025
- Common FAQs About Real Estate Photo Editing
- Level Up Your Real Estate Photo Editing With PhotoUp!
Are you looking to learn some of the most powerful real estate photography photo editing techniques?
High-quality photos are crucial to attract potential buyers in today’s competitive real estate market. Professional photo editing is pivotal in transforming ordinary images into captivating visuals that sell properties faster and for higher prices.
In this guide, we’ll show you the top 18 real estate photo editing tips for 2025 with step-by-step tutorials. We’ll also explain why editing is essential, and answer some common questions about real estate photo editing.
Let’s get started!
Why Is Real Estate Photo Editing Crucial in Today’s Market?

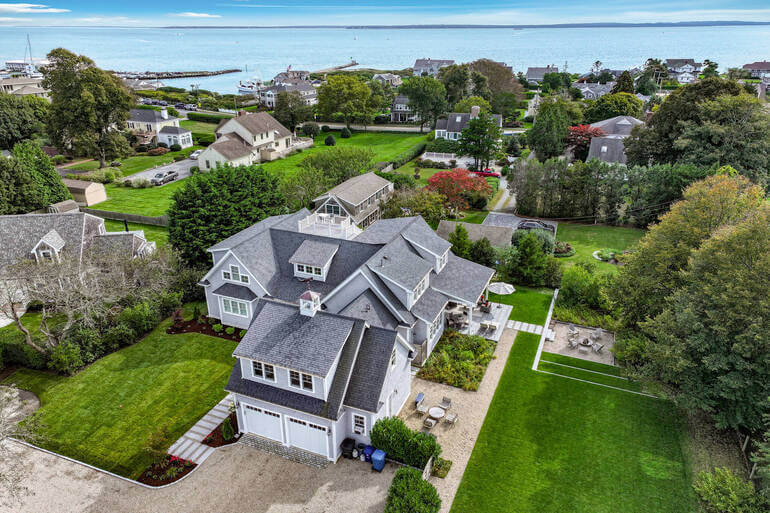
The real estate market is becoming increasingly competitive, with buyers relying heavily on online listings to make decisions. Stunning photos can make a property stand out and generate more interest.
According to the National Association of Realtors (NAR), 100% of home buyers begin their search online, and listings with clear, professional photos attract more clicks and views, boosting engagement and inquiries.
Real estate photo editing ensures the images showcase the property in its best light, highlighting key features and minimizing distractions.
It helps real estate agents and photographers create a professional, polished, and inviting portfolio that builds trust and appeals to buyers.
Additionally, listings with professional photos sell 32% faster than those without and can enhance a property’s perceived value by as much as 39%, influencing buyer perceptions.
As you can see, post-processing is crucial to creating captivating listing images that will help sell homes faster at higher price points.
Top 18 Real Estate Photography Editing Tips for 2025
With this in mind, here are our top 18 real estate photography photo editing tips to help you enhance your listing photos and ensure they stand out in a crowded marketplace.
1. Correct Perspective and Align Horizons


Before diving into the editing process, it’s essential to have a solid grasp of composition. Capturing photos from optimal angles can greatly minimize the need for extensive post-processing.
While shooting, apply the rule of thirds to create balance, pay attention to symmetry and straight lines, and aim to photograph each room from its most flattering perspective. Misaligned lines can make spaces look distorted and unprofessional.
If the angles still don’t turn out as intended, perspective correction can resolve this issue during post-processing.
This adjustment technique addresses distortion and misaligned horizontal lines, aligning them with the frame to produce a more natural and polished image.
To see how to align verticals, you can check out our video tutorial on how to straighten verticals in Photoshop:
2. Optimize Brightness and Contrast


Brightness and color correction form the foundation of effective image enhancement and can be achieved using tools like Lightroom and Photoshop.
Although adjusting color, contrast, tone, and sharpness may appear straightforward, these minor tweaks can dramatically elevate an image.
With just a few simple edits, a dull photo can be transformed into one that is vibrant and visually appealing.
These fundamental retouching techniques have the power to turn an ordinary photo into a stunning image that grabs attention, helping your clients attract buyers and sell their properties.
To learn how to adjust the colors, check out our step-by-step tutorial on how to color correct in Photoshop.
Additionally, this video tutorial walks you through how to brighten a photo in Photoshop:
3. Replace Skies for a Dramatic Effect


It’s no secret that vibrant, sunny days can make colors pop in real estate photos, while cloudy or overcast skies often leave images looking flat and uninviting.
Fortunately, with a few straightforward editing techniques, you can transform a dull sky into a stunning, picture-perfect backdrop.
Sky replacement in real estate photography offers several benefits, including:
- Enhancing the property’s visual appeal
- Creating a more uplifting atmosphere
- Giving photographers the flexibility to shoot without worrying about weather conditions or the time of day
By using tools like Photoshop, it’s easy to swap gray, cloudy skies for bright, sunny ones, elevating your photos to a whole new level.
To learn how to transform dull skies into bright and inviting ones, check out our video tutorial on how to replace a summer sky in Photoshop:
4. Perform Day-to-Dusk Conversions


In this step, we’ll show you how to take sky replacements to the next level and transform daytime images into twilight shots to add drama and appeal to your property listing.
Twilight editing is the process of taking an exterior photo of a home taken during a sunset or sunrise — the golden hour and editing it to enhance or alter its colors and/or light to give it a romantic glow.
Having a twilight image as the listing’s main photo averaged 76% more views than listings without the use of twilight images. This editing technique also gives a luxurious vibe to a property, which can lead to a higher sales price.
To learn how to add more drama and a romantic feel to your real estate photography, check out this video tutorial on how to edit a day-to-dusk image using Photoshop:
5. Enhance Lawn and Garden Appearance


A lush, vibrant green lawn is one of the most inviting features of a home’s exterior, instantly creating a welcoming atmosphere.
However, capturing this ideal look isn’t always possible. Whether it’s the wrong season, dry weather, or patches of dead grass, the lawn may not appear its best during your photoshoot.
The good news is that tools like Lightroom and Photoshop make it easy to revitalize your lawn in post-processing.
With a few color adjustments, you can transform dry or patchy grass into a healthy, green landscape, enhancing the overall appeal of your photos.
To learn how to create a green beautiful lawn, check out our video tutorial on how to make grass green in Photoshop:
I hope you find our real estate photography photo editing tips useful so far. Let’s move on to HDR bleeding next.
6. Apply HDR Blending for Balanced Lighting


High Dynamic Range (HDR) photography can bring out the best in your real estate images, especially when dealing with challenging lighting situations.
This technique helps you combine multiple exposures to highlight details in both shadows and highlights for a perfectly balanced photo.
To create HDR images, you should shoot your subject in at least three bracketed images using different exposures. Then, all you have to do is merge the photos into one to show its highlights and shadows.
For more details, see our video tutorial on how to edit HDR photos in Lightroom:
Have You Ever Thought To
Outsource Photo Editing?
Try it today with 10 free edits from three professional photo editors.

7. Remove Clutter and Unwanted Objects


During a photoshoot, you won’t always have full control over the property’s appearance, and unexpected details can sometimes detract from the image’s appeal.
Here are some common scenarios where decluttering and object removal can make a significant difference:
- A car parked in the driveway obstructs the beautiful view of the garden
- Tangled TV cords create visual clutter
- An overlooked frying pan on the granite counter disrupts the otherwise perfect kitchen shot
- Cracks in the bathtub or peeling wallpaper in the kitchen distract from the home’s charm
- A passerby unintentionally appears in the frame, drawing attention away from the property
Virtual decluttering removes these distractions, making spaces appear cleaner and more spacious.
Using tools like the Clone Stamp or Healing Brush, you can effortlessly remove unwanted objects, ensuring the viewer’s focus remains on the property’s best features.
To learn how to declutter your images, watch this tutorial video on how to remove cords in Photoshop:
In this video, you can also learn how to remove a car from a driveway in Photoshop using more advanced real estate photography photo editing techniques:
8. Adjust the White Balance in Your Photos


As a real estate photographer, you know that white balance is crucial for achieving realistic colors in your digital photographs.
It’s the process of setting your images to neutral, ensuring that whites appear white without any unwanted tints such as blue or orange.
This adjustment brings a sense of authenticity and enhances the overall quality of your pictures.
You can adjust the camera settings to improve white balance but if that still doesn’t help, here are two simple techniques on how to adjust white balance in Photoshop:
9. Remove Color Casts


Mastering color cast removal is an essential skill when editing real estate photos.
A color cast—an unwanted tint of color across a photo—can be particularly problematic in real estate photography, where visuals need to be both accurate and visually captivating.
This distracting effect often arises from specific lighting conditions or camera settings.
Common causes of color cast include:
- Fluorescent lighting creating a bluish tint
- Dark window films altering the natural tones of beige walls
- Overcast skies outside dulling the vibrant appearance of interior walls
- Incorrect camera color settings impacting the home’s true colors
The good news is that color cast can be effectively corrected during post-processing.
Using simple real estate photography photo editing techniques, you can neutralize and remove these unwanted tints, restoring the true and vibrant colors of the space to enhance its overall appeal.
To learn more, check out our video tutorial on how to easily remove color cast from real estate images in Photoshop:
10. Use Window Masking Techniques


By masking windows in interior shots, you can capture the beauty of the space while also capturing the breathtaking views outside.
It’s a great way to ensure a natural-looking balance between indoor and outdoor lighting, making windows clear and inviting.
During photo shoots, even with thorough preparation, balancing light can be quite a challenge. This is especially true when dealing with strong sources like the sun.
As sunlight streams through windows, it gets amplified by the glass, causing glares and overexposures that need to be addressed.
However, with window masking, you can ensure a nice outside view while the interior elements are also highlighted in the image.
This step-by-step tutorial walks you through the best and quickest way to mask windows in Photoshop:
11. Sharpen Images for Professional Quality


You can bring your visuals to life by experimenting with image sharpening in Photoshop—add dimension, depth, and contrast along the edges of any object.
With this simple real estate photography photo editing technique, you can make dull images pop, whether it’s a real estate listing or an artsy masterpiece, you can create truly captivating photos.
In this video tutorial, we’ll show you how to sharpen an image in Photoshop using 4 easy steps:
12. Remove Possible Lens Flare


Capturing the perfect shot is a blissful moment for any photographer. However, the sudden appearance of lens flare can quickly tarnish that immaculate image.
Particularly for real estate photographers, where clarity and optimal lighting are essential, a lens flare is an unwelcome guest.
Thankfully, Photoshop is your ultimate fix—it works like a magic wand to eliminate these optical distractions.
With tools like the Clone Stamp, you can quickly remove any unwanted light spots and restore your photo’s clarity and professionalism:
To learn how to perform this edit, watch our video tutorial on how to remove lens flare in Photoshop:
13. Minimize Noise in Low-Light Photos


Noise or grain appears as millions of hazy dots and decreases the image’s clarity and quality. Seeing that makes otherwise beautiful photos look grainy and unappealing.
For example, noise can be a result of either low light settings, errors in pixel density, exposure time, or even sensor size.
Reducing graininess in images taken in low-light conditions creates a cleaner, more professional look.
To learn how to do this, check out our video tutorial on how to reduce noise in Lightroom and Photoshop:
14. Create Panoramas for Wide Spaces
When it comes to photographing real estate, capturing a 360-degree view is often a must. This is particularly valuable in interior photography, as panoramic images offer a complete perspective.
Photo stitching is the process of merging multiple photographs to create a single high-resolution or panoramic image.
For example, you can stitch images together to showcase expansive areas like backyards, living rooms, or open-plan layouts.
With Lightroom, you have the power to seamlessly merge multiple photos. To learn how to perform this technique, you can check out our video tutorial on how to stitch photos in Lightroom:
15. Remove Distracting Shadows


When shooting real estate interiors and exteriors, you may encounter problems with shadows and uneven lighting.
While shadows can add contrast and dimension to an image, they can also be distracting and make your real estate photography look less professional.
You can use Lightroom or Photoshop to adjust shadows, highlights, whites, and blacks.
To see how this real estate photography photo editing technique is done, check out our video tutorial on how to remove shadows in Lightroom:
Additionally, flash shadows are also a common issue when shooting interiors with artificial lighting.
To learn how to combat this, you can check out our short video tutorial on how to remove flash shadows in Photoshop:
16. Replace a Black TV Screen


In real estate photography, large flat-screen TVs are often a noticeable feature in dens, bedrooms, living rooms, and family spaces.
Instead of leaving the screen blank, consider replacing it with an image of a cozy baking show or something that evokes a warm, “homey” atmosphere.
This small touch can help potential buyers imagine themselves unwinding on the couch and enjoying their new home.
Here’s a neat and easy trick to add a TV image to an otherwise empty TV screen using Adobe Photoshop:
17. Add a Fire in the Fireplace for Warmth


If your interior real estate photos look a bit cold and dull, there’s an easy fix!
You can make your interior images warm, interesting, and inviting by adding a beautiful fire in that unlit fireplace using some simple steps in Photoshop.
Imagine how much warmer and cozier your real estate photos will look with a fire you can almost hear crackling.
To learn how to do this neat edit, check out our tutorial on how to add fire to a fireplace using Photoshop:
18. Leverage the Visualization Power of Virtual Staging on Empty Spaces


Virtual staging acts as a powerful technique to reimagine vacant and outdated properties, offering prospective buyers an engaging glimpse of a furnished space.
It skillfully integrates computer-generated furniture and décor into your photos, creating a contemporary, warm, and welcoming ambiance that captivates and connects with house hunters
Virtual staging services like PhotoUp give you several design options to help you cater to any market. We offer a professional library, including 11 interior design styles:
- Mid-Century Modern
- Scandinavian
- Coastal
- Farmhouse
- Modern
- American
- Industrial
- Hamptons
- Luxury
- Southwestern
- And Commercial
We offer a design style to stage any empty or outdated space! Best of all, our virtual staging service is affordable and starts at the low cost of $20 per image.
Offering this service to your agent clients can help make you even more valuable as a marketing source and grow your photography business.
PhotoUp Virtual Staging Demo
To see how quick and easy it is to use PhotoUp’s virtual staging service, check out our 5-minute virtual staging demo:
And there you have it!
Real estate photo editing is no longer optional in 2025—it’s a necessity. Following these 18 powerful tips will help you deliver high-quality images that captivate buyers and close deals faster.
Whether you edit photos yourself or outsource to professionals, investing in quality visuals will elevate your real estate photography and boost your business success.
Common FAQs About Real Estate Photo Editing


1. Why should real estate photographers edit their images?
Editing ensures the property is presented in the best light, attracting more buyers and helping listings stand out online. It also helps with offer prices.
2. Can I edit real estate photos myself?
Yes, but using professional software like Lightroom or Photoshop requires skill. Outsourcing to real estate photo editing experts like PhotoUp can help you save time and deliver superior results.
3. How long does it take to edit a real estate photo?
Editing times vary based on complexity, but basic edits may take 15–30 minutes per image. Outsourcing often speeds up turnaround times.
4. What is the cost of professional real estate photo editing?
Costs typically range from $0.75 to $10 per image, depending on the level of editing required and the service provider.
5. What tools do professionals use for editing?
Tools like Adobe Photoshop, Lightroom, and specialized platforms like PhotoUp and BoxBrownie are commonly used. AI editing tools such as AgentUp are also increasingly popular.
Have You Ever Thought To
Outsource Photo Editing?
Try it today with 10 free edits from three professional photo editors.
Level Up Your Real Estate Photo Editing With PhotoUp!
Level up your real estate photography with PhotoUp’s specialized photo editing services!


By partnering with a dedicated editor, you’ll gain consistent, personalized editing that aligns perfectly with your brand, ensuring fast turnaround times and a polished, professional look.
Your dedicated editor will fully immerse themselves in your business, mastering your unique style to create a cohesive and recognizable visual identity.
Beyond editing, they’ll manage your image files and support your broader marketing efforts, including:
- Photo culling
- Organization
- Account management
- Photo delivery and placement
Additionally, they can assist with advanced services like virtual staging, virtual tours, property websites, and other marketing needs. With expertise in tools like Lightroom and Photoshop, they bring exceptional skill to every project.
A dedicated editor streamlines your workflow, strengthens your brand presence, and ensures your visual content consistently stands out in the competitive real estate market.
Browse Top Dedicated
Real Estate Photo Editors
Ready-to-hire editors for real estate photo editing, and more.
How to Get Started
Getting started with a dedicated photo editor is easy.
Step 1. Reach out to the sales team via email at support@photoup.net to express your interest in trying out a dedicated editor.
Step 2. Upload a Dedicated Editor Trial, enabling you to submit one set of images to three dedicated editor candidates.
PhotoUp Dedicated Editing – Real Estate Photo Editing
To see how easy it is to get started with a dedicated editor, check out our dedicated editing demo:
As simple as that!
During the free trial period, PhotoUp remains committed to collaborating with you until you are completely satisfied with the results and service.
After evaluating the edited images, you can schedule interviews with the most suitable editor(s), leading seamlessly into a one-month trial period.
A Complete Real Estate Marketing Partner

There’s more to real estate marketing than photo editing. PhotoUp offers a full range of services to handle all your real estate marketing needs, including:
- Virtual staging
- Virtual tours
- Real estate photographer websites
- Single property websites
- Floor plans
- Property flyers
- House portraits
- And Virtual Assistants
So, why wait?
Sign up for a free PhotoUp account today and let our expert team of editors help you create stunning real estate photography!
We hope this guide helped you learn 18 powerful real estate photography photo editing techniques to help you create impressive and captivating listing images. Before you go, you may also want to check out the following resources:

