


Table of Contents
- What Is the Brush Tool in Photoshop and Its Uses?
- Understanding the Brush Tool’s Basic Settings
- Understanding the Options of the Brush Tool
- How to Use the Brush Tool in Photoshop (Step-by-Step)
- Outsource Your Photo Editing to the Experts at PhotoUp
Photoshop is an invaluable tool for creating stunning real estate images. It offers numerous editing features, one of which is the Brush Tool – a feature that enables you to make precise changes to specific areas of your photos.
Using the Brush Tool is a must for real estate photographers, especially when you need to fix dodge areas of an image, paint over blemishes, or smoothen textured surfaces.
But with such a vast array of brush settings, it can be intimidating for some to get started.
In this guide, we’ll show you how to use the Brush Tool in Photoshop so that you can create impeccably property photos for your real estate clients.
What Is the Brush Tool in Photoshop and Its Uses?
The Brush Tool in Photoshop is essentially a virtual paintbrush that allows users to apply color, texture, and various effects to an image.
This tool features a variety of brush shapes, sizes, and opacities that can be customized to the user’s specific needs. Thus, users can create various styles of artwork, from realistic paintings to abstract designs.
The Brush Tool in Photoshop also offers a range of advanced features, such as pressure sensitivity, which makes it possible to adjust the thickness or opacity of the brush stroke based on how hard the artist presses down on the stylus.
Additionally, it has blending modes that enable users to blend colors and create smoother transitions between them.
One of the most popular uses of the Brush Tool is to retouch or enhance photos. This enables real estate photographers to correct blemishes, smooth out uneven tones, and add or remove elements from their images.
It is also widely used in digital painting and graphic design projects, allowing for the creation of diverse styles of artwork and designs.
Understanding the Brush Tool’s Basic Settings
Before you can start using the Brush Tool, it’s essential to understand its basic settings.
Photoshop has two types of brushes: soft and hard brushes:
- A soft brush creates a soft and gradual effect
- Whereas a hard brush creates a crisper look
There are also five brush modes to select from:
- Normal
- Dissolve
- Multiply
- Screen
- And overlay
The blend determines how the brush interacts with the pixels in the photo.
Understanding the Options of the Brush Tool
The Brush Tool offers a range of important options that can greatly enhance your images. Here’s a breakdown of each option.
Brush Size
The brush size property allows you to adjust the size of your brush based on your specific needs.
To change the brush size, simply click on the brush picker drop-down button or right-click on the image or document.
A pop-up will appear with a slider that enables you to make the brush larger or smaller.
Alternatively, you can enter a desired number in the input box. You can also use keyboard shortcuts: use the ] key to increase the brush size and the [ key to decrease it.
Brush Hardness
Brush hardness refers to the intensity of your brush strokes. It determines whether your strokes are sharp-edged (harder) or soft-edged (softer).
In the same drop-down menu mentioned earlier, you’ll find a slider labeled “Hardness” that allows you to adjust the hardness of your brush.
Brush List
Within the same drop-down menu, you’ll also find a list of different brush presets available in Photoshop.
These presets offer a variety of brush styles that you can choose from based on your specific requirements.
Brush Settings
After the brush picker dropdown icon, you’ll see an icon for brush settings. Clicking on this icon opens up additional settings that you can experiment with to achieve the desired results for your artwork.
Here, you can control various aspects, such as the noise or texture of your brush. You can also adjust the overall softness of the brush using the softness slider.
Blend Modes
Blend modes are powerful features in Photoshop that determine how different brush strokes blend with each other.
Within the Brush Tool options, you’ll find a blend mode drop-down menu where you can choose from various blending options based on your needs.
For example, the “Dissolve” blend mode can be used to create rough edges and dissolve them with the existing strokes.
Brush Opacity
Opacity allows you to control the visibility of your brush strokes. By adjusting the opacity slider, you can set the value anywhere between 0% and 100%.
Higher opacity means higher visibility, while lower opacity means lower visibility of your brush strokes.
Brush Flow
When working with brushes, an important property to consider is brush flow. So, what exactly is brush flow? Well, it refers to the amount of color that can flow through the brush while painting.
If the brush flow is set to a high value, more color will flow through the brush, which can lead to a messy result.
To avoid that, it’s recommended to set a low flow value. This will reduce the intensity of the color flow, resulting in better control and a more desirable outcome.
Flow values typically range from 0% to 100%, and you can adjust them using a slider or inputting the desired percentage.
Pencil Tool
The Pencil Tool is a sub-tool of brush tools and has some unique characteristics. In terms of properties, it shares all the features of the brush tool that we discussed earlier, except for brush flow.
The Pencil Tool is essentially a fine thin tip of the brush, allowing for precise and detailed work. So, if you need to create lines or add intricate details to your artwork, this tool is your friend.
Remember, understanding brush flow and utilizing the Pencil Tool can greatly enhance your images and digital art experience.
The Ultimate All-in-One
Real Estate Photographer Business Platform
Grow a successful real estate photography business with PhotoUp.

How to Use the Brush Tool in Photoshop (Step-by-Step)
Now that you know what the Brush Tool in Photoshop is and its basic settings, let’s move on to showing you how to use it to edit your real estate photos.
You can either watch the video tutorial or continue reading the text below:
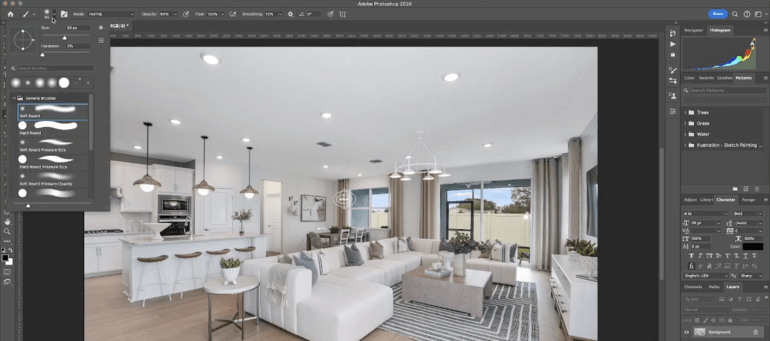
Step 1. To get started, open your project in Adobe Photoshop. Locate the Brush Tool in the Tools panel on the left side of the screen. It looks like a paintbrush. You can also press the B key to select it quickly.
Step 2. At the top of the Photoshop window, you’ll see an option for the Brush Picker. Click on it to reveal a drop-down menu with different brush types. Select the brush you want to use.
Step 3. Once you’ve selected a brush, you can adjust its settings using the Options bar at the top. Here you can change the size, hardness, and opacity of the brush.
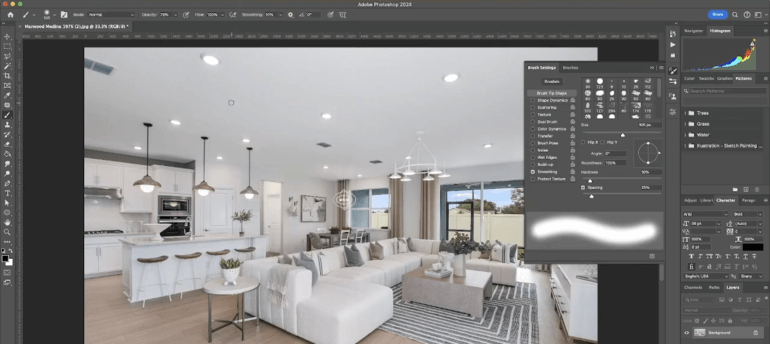
Advanced Brush Settings
Step 4. For more advanced settings, open the Brush Settings panel by clicking on the icon next to the brush picker or by going to Window, then Brush Settings.
Step 5. The Brush Tool paints with the current foreground color. To change this color, click on the Foreground Color Box in the Tools panel and choose a new color from the Color Picker.
Step 6. Click and drag your mouse over the canvas to start painting. You can create strokes, dots, or any pattern you like.
Experiment with different brush strokes and pressures if you have a pressure-sensitive device.
Step 7. To keep your brush strokes separate from other elements, create a new layer by clicking the New Layer icon at the bottom of the layers panel or by pressing Ctrl shift + N.
Make sure the new layer is selected when you start painting.
And that’s how you use the Brush Tool in Photoshop!
To recap, the Brush Tool is an essential feature in any real estate photographer’s toolkit, and it’s worth spending time mastering.
With Photoshop’s vast array of brush settings, starting can be intimidating, but with practice, you’ll quickly see the benefits of using it.
Have You Ever Thought To
Outsource Photo Editing?
Try it today with 10 free edits from three professional photo editors.
Outsource Your Photo Editing to the Experts at PhotoUp
If you rather spend your precious time shooting more properties and getting more clients for your photography business, you should consider outsourcing your editing to PhotoUp.
With over a decade in the business and several hundred skilled photo editors around the world, it’s hard to beat PhotoUp’s quality, service, and pricing.
Affordable Real Estate Photo Editing
Starting at the low cost of $1.10 per image (depending on the subscription), our skilled photo editors can help with the following issues:
- Advanced object removal
- Improper exposure levels
- Harsh shadows, lack of light, etc.
- Blurred images that were taken without a tripod
- Images that need cropping or other effects
- Image correction and enhancement
- Color and tone adjustments
- Lawn greening and sky replacements
- Line and angle corrections
- And much more!
Browse Top Dedicated
Real Estate Photo Editors
Ready-to-hire editors for real estate photo editing, and more.
A Complete Real Estate Marketing Partner
On top of that, PhotoUp also offers other real estate marketing services, such as:
- Virtual staging
- Virtual house tours
- Video editing
- Real Estate Photographer Websites
- Single property websites
- Property flyers
- House portraits
- Floor plans
- And Virtual Assistants
As you can see, we have everything you need to enhance and market real estate in one user-friendly platform!
PhotoUp Real Estate Photo Editing Uploader Demo
To see how easy it is to get started with PhotoUp, you can check out our real estate photo editing uploader demo:
And there you have it! It’s really that easy to get started using PhotoUp’s software.
So, sign up for a free PhotoUp account today, and let PhotoUp’s skilled editors help you enhance your images in less than 24 hours!
When signing up for an account, you’ll receive 10 free credits that you can use to purchase any of our services.
We hope this guide helped you learn how to use the Brush Tool in Photoshop. If you found this blog post useful, you may also want to check out the following resources:

