


Table of Contents
- What Are Smart Objects?
- Understanding Smart Objects vs Linked Smart Objects
- Benefits of Using Smart Objects
- How to Use Smart Objects in Photoshop (Complete Tutorial)
- Save Even More Time on Editing With PhotoUp!
Photoshop is a powerful tool that offers many features to enhance your real estate photography. Smart Objects, in particular, enable you to perform non-destructive editing, which is essential for maintaining the quality and integrity of your property photos.
This tutorial is designed to walk you through the basics of how to use Smart Objects in Photoshop. It includes examples relevant to real estate photography, making it easy for you to apply these techniques to your work.
Whether you’re new to Smart Objects or looking to expand your knowledge, let’s dive in!
What Are Smart Objects?
Smart Objects are layers within Photoshop that contain image data from raster or vector images, such as those created in Photoshop or Illustrator.
They retain the original characteristics of an image, allowing you to work flexibly with its content without causing any harm to the source.
Additionally, Photoshop offers a neat trick called Linked Smart Objects, a creative feature that allows you to link your content directly from external image files.
These linked objects act as dynamic placeholders, ensuring that any changes made to the source files are automatically reflected within the document containing the linked Smart Object.
This feature is a game-changer for images and designs that require frequent updates or for collaborative projects where multiple versions of an asset may be in use.
By utilizing Linked Smart Objects, you can keep your designs seamlessly integrated without the need for constant file replacements or updates.
Understanding Smart Objects vs Linked Smart Objects
Understanding Smart Objects vs Linked Smart Objects can be confusing. Here are the differences between the two:
- Smart Objects: Think of these as ‘containers’ for your image data. They retain the original properties of the image you’re working with, allowing you to make changes at any time without degrading the image
- Linked Smart Objects: These take Smart Object functionality a step further by allowing you to reference external image files. Any changes made to the source file for a Linked Smart Object reflect automatically in all linked instances across Photoshop documents without updating each individual layer
Overall, working with Smart Objects and Linked Smart Objects helps you save a lot of time, work with non-destructive editing, and improve your workflow.
Let’s take a look at some more benefits of this method.
Benefits of Using Smart Objects
There are many benefits to working with Smart Objects when editing photos, including:
- Smart Objects allow you to manipulate layers with absolute freedom, repositioning, rescaling, or distorting them to achieve your artistic vision while preserving the quality of the source material untouched
- It lets you unlock the ability to work seamlessly with vector data directly from Adobe Illustrator, transferring detailed and resizable artwork effortlessly into your Photoshop projects
- It provides the benefit of nondestructive filtering, which grants you the flexibility to adjust or remove filters applied to your Smart Objects at any time, refining your creative output with precision
- It further enhances your workflow, Photoshop offers the convenience of one Smart Object that can be edited while automatically updating all linked instances across your project. This time-saving feature ensures consistency in styles and effects, presenting a coherent visual narrative
- By applying layer masks directly or indirectly linked to Smart Object layers, you can easily control which parts of the object are visible or hidden, contributing to more dynamic and context-specific compositions
- It allows you to begin your design process with low-resolution placeholders, experiment with layouts, and easily replace them later with higher-quality final versions, ensuring that your visual narratives evolve as you perfect them
In summary, Photoshop’s nondestructive tools open up a world of possibilities for real estate photographers and photographers in general, allowing for experimentation and refinement without any concern for permanent changes to the original picture data.
The Ultimate All-in-One
Real Estate Photographer Business Platform
Grow a successful real estate photography business with PhotoUp.

How to Use Smart Objects in Photoshop (Complete Tutorial)
Now that you know what Smart Objects are and the benefits of using them, let’s walk you through how to use Smart Objects in Photoshop step-by-step.
You can either watch the video tutorial or continue reading the text with the screenshots below:
Import Your Real Estate Photo
Step 1. Open Adobe Photoshop and Import your real estate photo. This will be our starting image for the Smart Object tutorial.
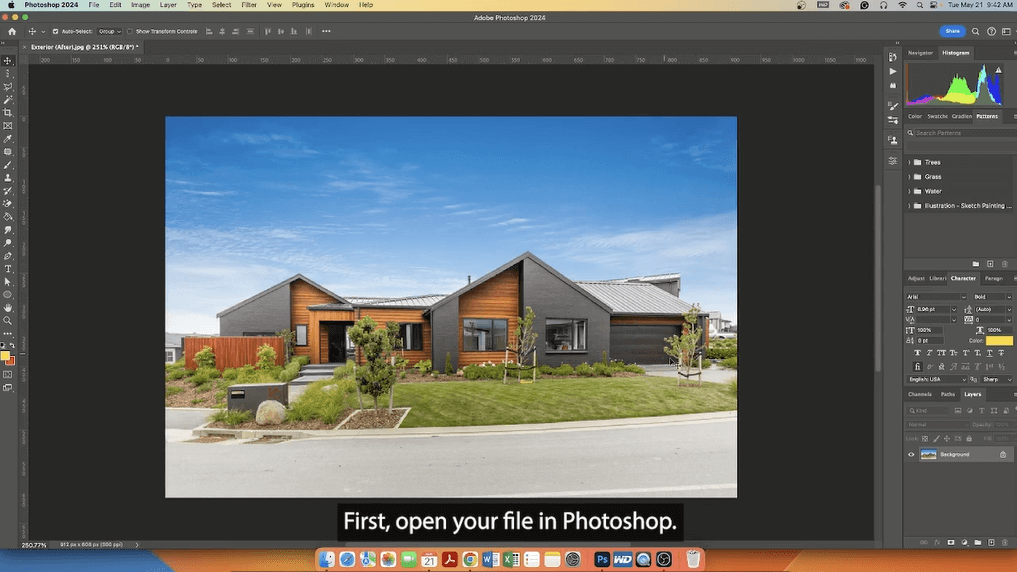
This ensures that the image will benefit from non-destructive editing, such as adjusting color and tone, without losing its original quality.
Converte Your Image to a Smart Object
The next step is to convert your image to a Smart Object.
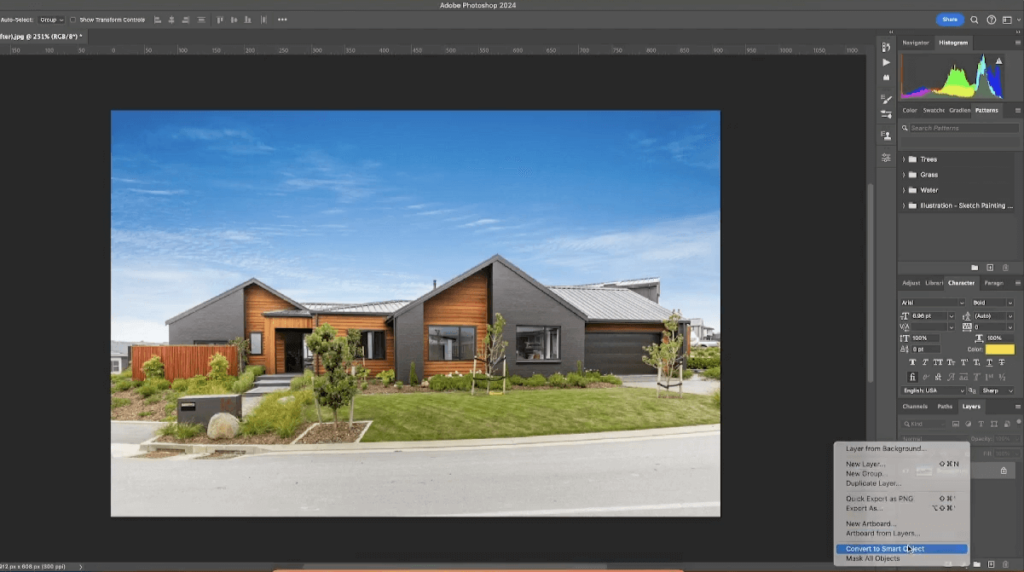
Step 2. Right-click on the Layer.
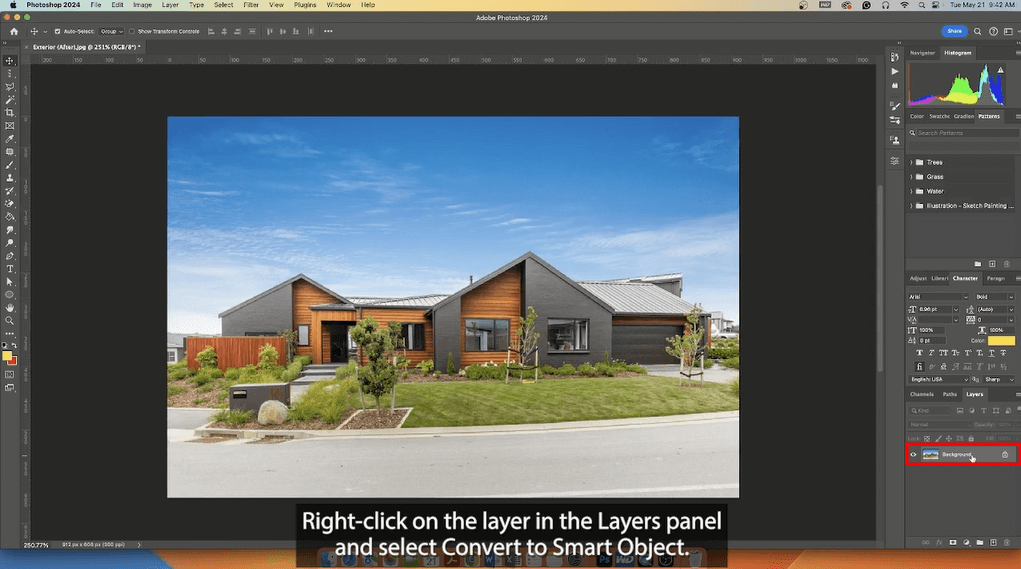
Step 3. Next, select Convert to Smart Object. You can also find this option under the Layer menu at the top.

This action changes the layer’s icon in the Layers panel, indicating it’s now a Smart Object, and enables you to perform non-destructive editing.
Perform Your Edits
Now, with the layer converted, you can start making your adjustments. Here are a few examples of what you can do:
- Color Correction: Use Hue/Saturation or Curves to adjust the colors and tones without permanently altering the image data
- Basic Retouching: Spot Healing, Content-Aware Fill, or the Clone Stamp Tool can fix minor imperfections or distractions
- Luminosity Masks: Create a selection based on the image’s brightness values to target specific adjustments
- Applying Filters: With Smart Filters, you can apply features like blurring, sharpening, or adding texture to your photos
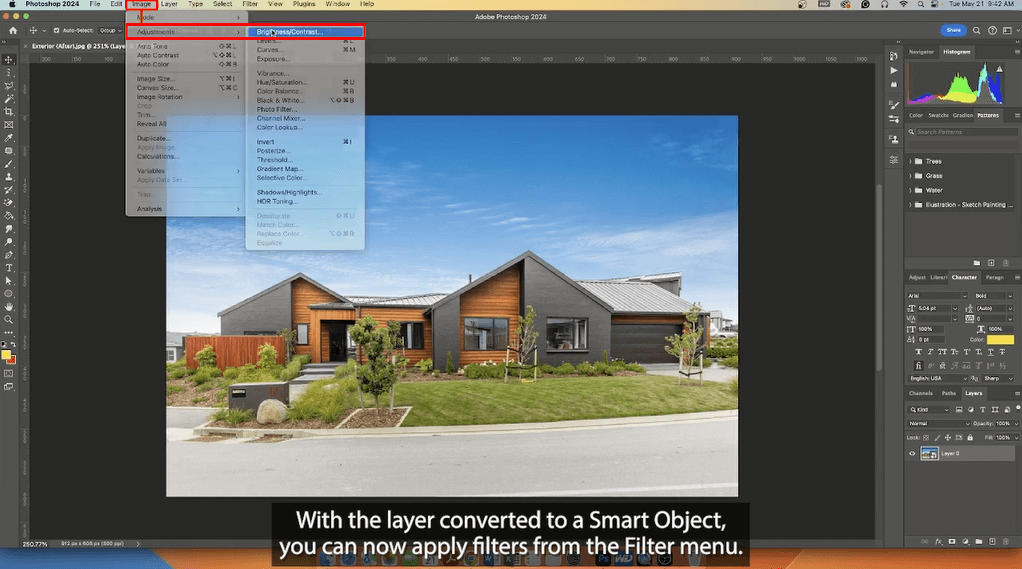
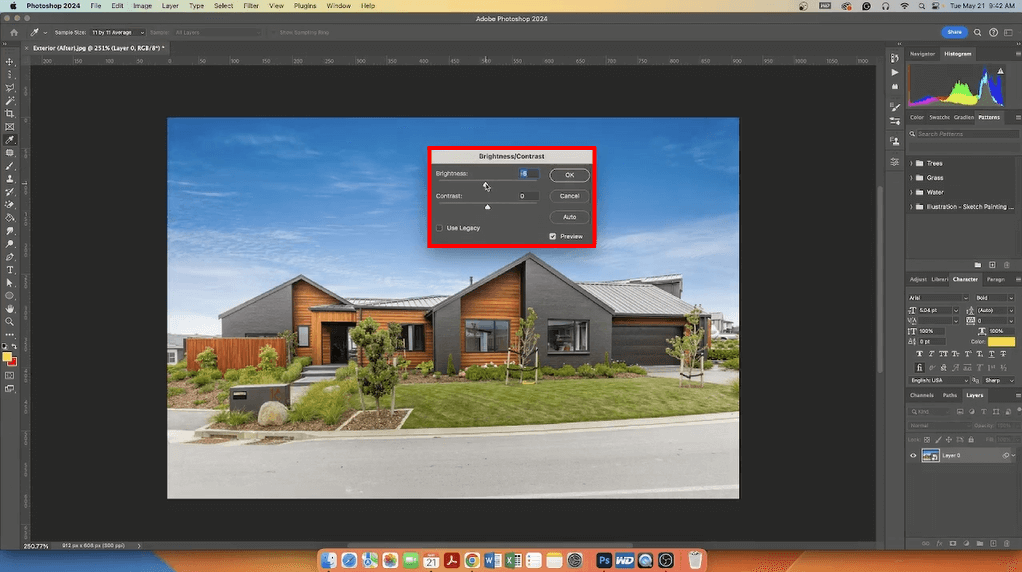
Step 4. With the layer converted to a Smart Object, you can now apply filters from the Filter menu. In this example, we’ll adjust the Brightness and Contrast.
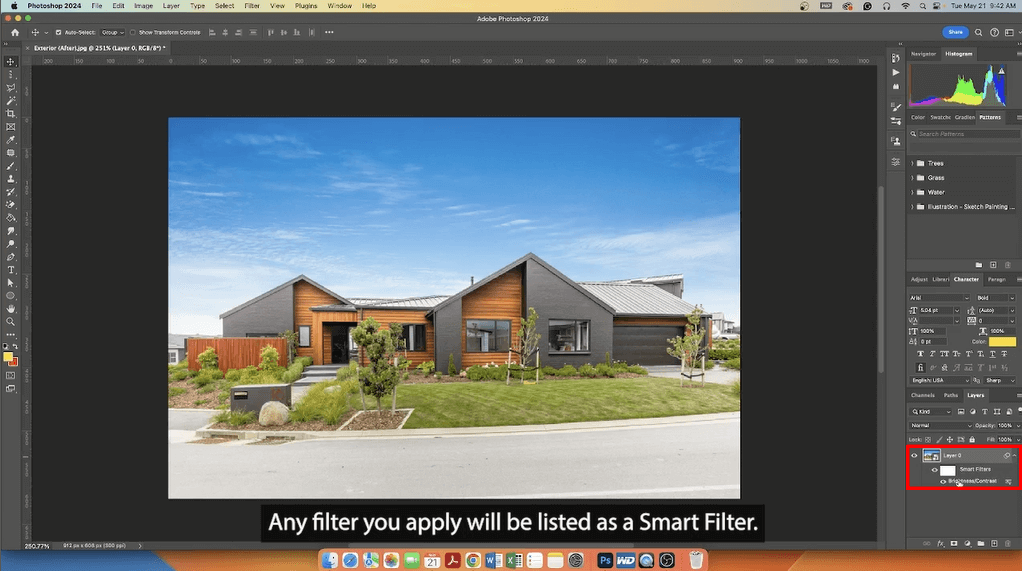
Step 5. Any filter you apply will be listed as a Smart Filter, allowing you to adjust, hide or remove it without affecting the original image.
Edit the Content of Your Smart Object
Step 6. If you need to edit the content of the Smart Object, double-click on its thumbnail in the Layers panel.
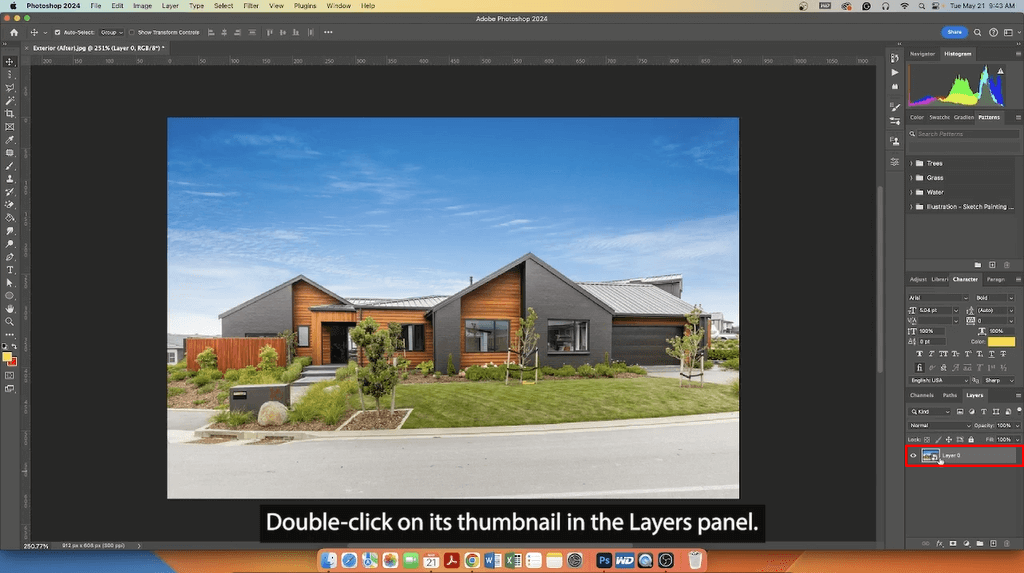
This will open the source content in a new image.
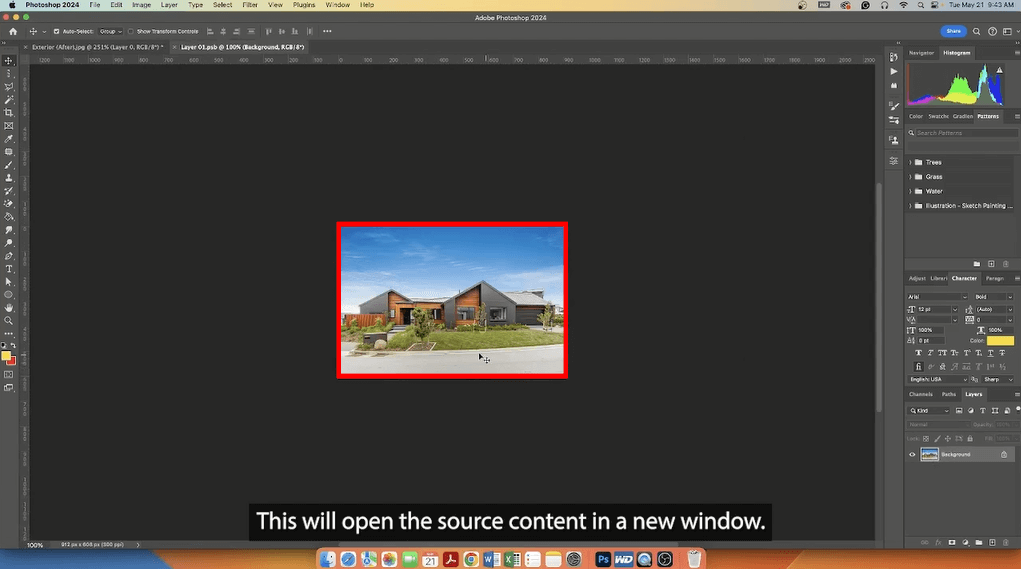
Make your edits and save. The changes will automatically update in the main document.
Transform Your Image Without Loosing Quality
Step 7. You can also transform an image without losing the quality. Click on Edit > Transform > Scale.
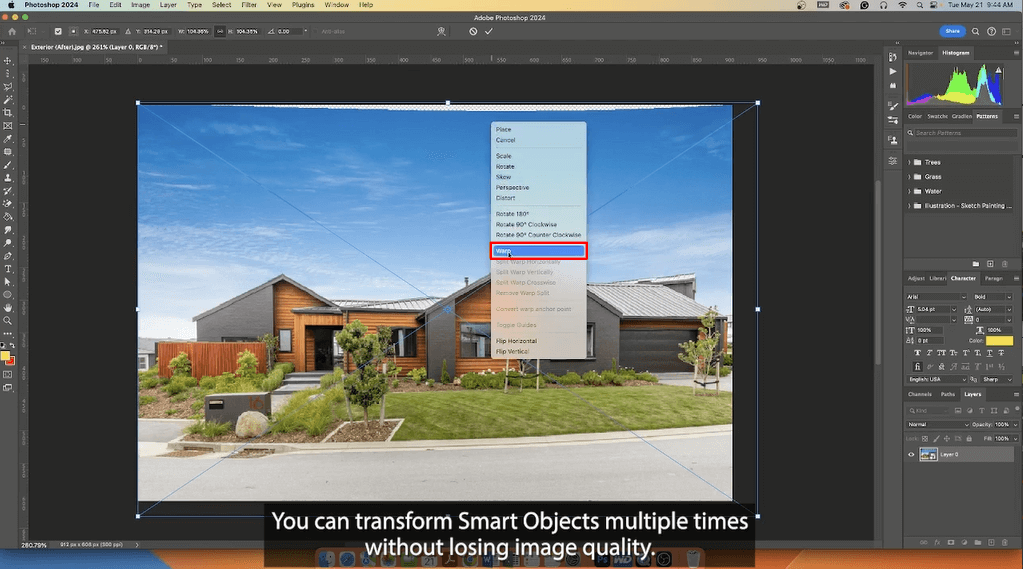
Step 8. Here you can Rotate or Wrap the image.
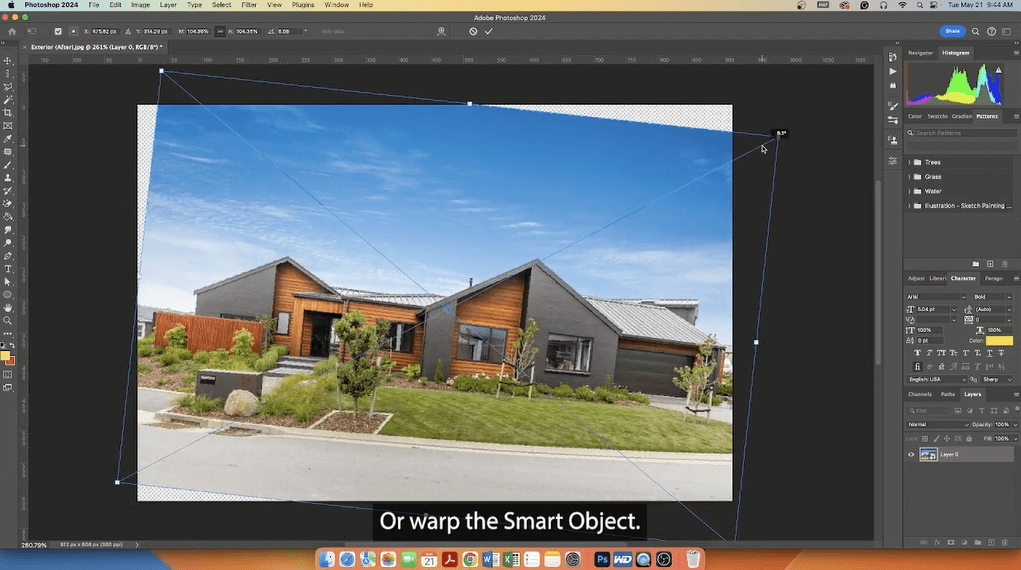
Unlike regular layers, you can transform Smart Objects multiple times without loosing image quality.
Create Multiple Copies of Your Smart Object
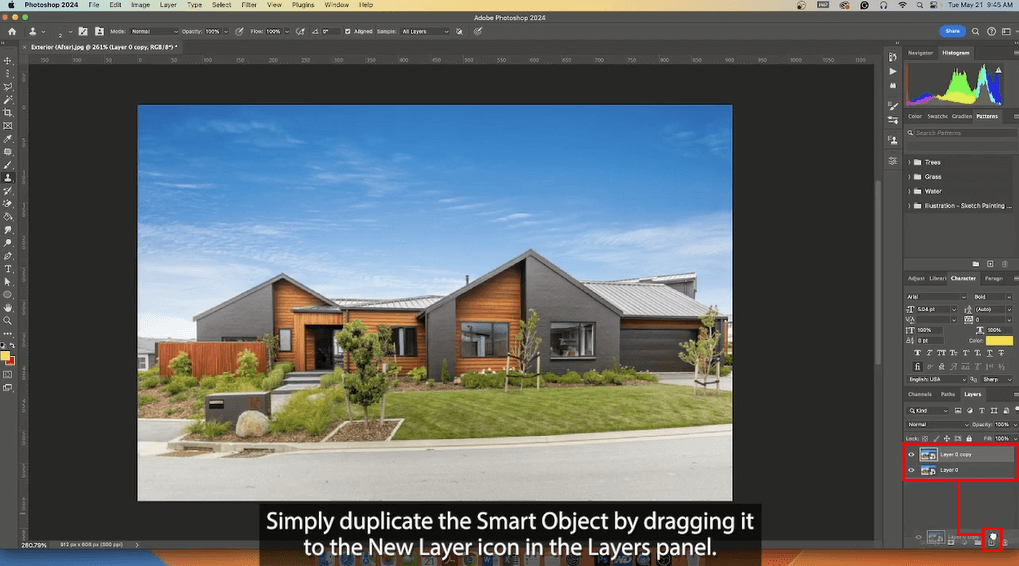
Step 9. If you want to create multiple copies of your Smart Object that all reflect the same changes, simply duplicate the Smart Object by dragging it to the New Layer icon in the Layers panel.
By following these steps, you can take full advantage of the flexibility and power of Smart Objects in your Photoshop projects.
Lastly, when saving your Photoshop document, ensure the Layers option is selected to keep the Smart Object capabilities intact.
And that’s it!
Final Thoughts
Smart Objects open a new world of possibilities for real estate photography and design work.
They enable non-destructive editing, time-saving through reusability, and greater overall control over your photography.
By mastering this feature, you can ensure your real estate photos look their best without compromise.
So practice these techniques and witness the power of Smart Objects transforming your workflow.
Have You Ever Thought To
Outsource Photo Editing?
Try it today with 10 free edits from three professional photo editors.
Save Even More Time on Photo Editing With PhotoUp!
Investing in a professional real estate photo editing service can be a game-changer.
It can help photographers save a lot of time they can spend on other high-impact tasks that will help them grow their business.
And time is money, so there’s a lot of potential savings to be made!
PhotoUp is a groundbreaking real estate photo editing company with over a decade in the industry and hundreds of editors in the Philippines and the US.
Our skilled team of editors can help you with the following issues:
- Brightness and color correction
- Vertical lines adjustments
- Advanced object removal
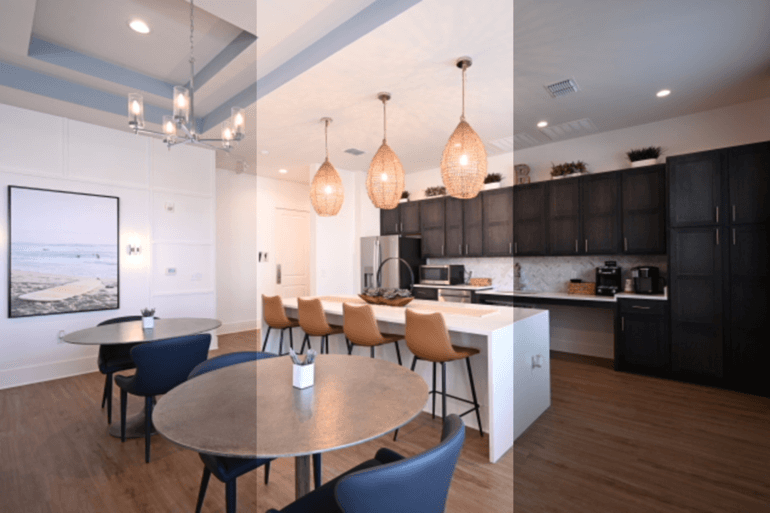
- Day-to-dusk conversion and Twilight editing
- Lawn greening and sky replacements
- HDR editing
- Manual blending
- Flambient editing
- And much more!
Browse Top Dedicated
Real Estate Photo Editors
Ready-to-hire editors for real estate photo editing, and more.
But that’s not all…
PhotoUp Offers More Than Just Editing

PhotoUp offers so much more than just editing! We are a complete one-stop-shop for real estate marketing services and also provide powerful tools such as:
- Virtual staging
- Virtual house tours
- Video editing
- Single property websites
- Real estate photographer websites
- Property flyers
- Floor plans
- Virtual Assistants
- And house portraits
You can find everything you need to market real estate under one roof.
Easy Upload & Order Process
Getting started with PhotoUp is super easy!
All you need to do is sign up for a free PhotoUp account, and you’ll get access to our user-friendly photo management system where you can upload and receive photos, send instructions, and download your beautifully edited images.
In addition, our software also allows you to track and manage team members and clients, store final images, and more. It can’t be easier to run and grow your photography business!
PhotoUp Real Estate Photo Editing Uploader Demo
To see how easy it is to get started with PhotoUp, have a look at our real estate photo editing uploader demo:
It’s really that simple to get help with editing!
So what are you waiting for?
Sign up for a free PhotoUp account today and let PhotoUp’s professional real estate photo editors help you edit your images so that you can spend time on other high-impact projects.
Best of all, when you sign up for an account, you’ll receive a bonus of 10 free credits to use however you please.
We hope this blog post helped you learn how to use Smart Objects in Photoshop. Before you go, you may also want to check out the following resources:

