


Table of Contents
- What Is Flambient Photography?
- How to Shoot Flambient Real Estate Photography
- Trust PhotoUp to Edit Your Flambient Photos
Given its popularity, how to shoot flambient photography is a common question for real estate photographers.
Flambient photography is valued in real estate and architectural photography for capturing properties, rooms, and spaces with flattering, natural-looking illumination.
While the flambient method isn’t difficult, not every photographer has experience using it.
So, in this article, we will explain how to shoot flambient real estate photography.
Let’s start by explaining what flambient photography is.
What Is Flambient Photography?
Most real estate photographers would agree that the goal of property photos is to present the property in a natural and flattering manner.
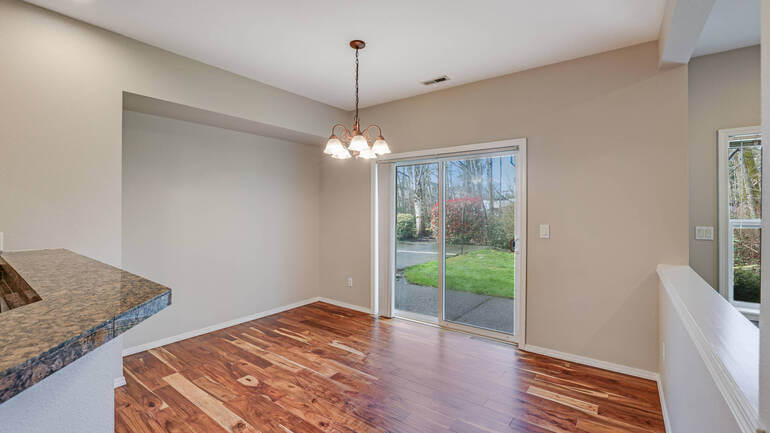
One way to achieve a natural and inviting look is to take what is called window pull photography.
Window pulls real estate photography is a technique for capturing a room’s interior and the view outside the window in a single, well-exposed photo.


Generally, window pulls create a more realistic representation of how a room looks in person. Our eyes naturally adjust to different light levels so we can clearly see the inside and outside of a room.
However, this type of photography is challenging because the lighting conditions inside the room and outside the window are usually very different.
This is where flambient photography enters the picture.
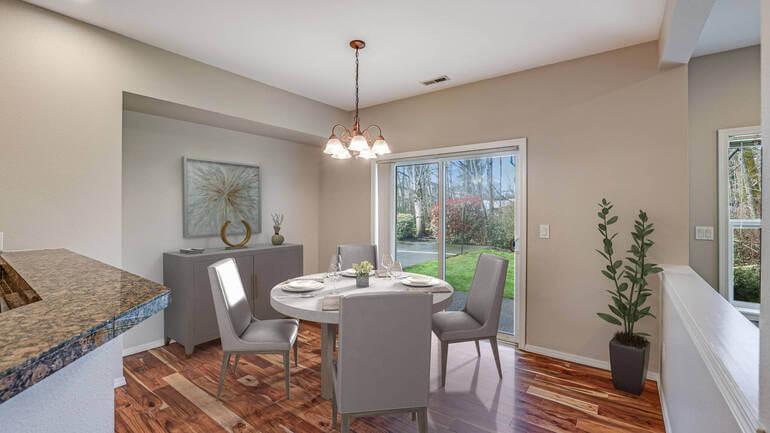
Flambient photography is a common technique used in real estate photography that combines flash and ambient light to create well-exposed, naturally appealing images of interiors.
The flambient technique works well with window pulls because it balances natural light coming through windows and artificial light from flashes, resulting in photos that look both natural and professional.
If you’d like to go deeper, here’s a further explanation on how to shoot the flambient method for real estate photography.
Now that you have a basic understanding of flambient photography, let’s focus on how to shoot using this method.
How to Shoot Flambient Real Estate Photography


Flambient photography isn’t hard to shoot and, in some ways, is similar to HDR photography.
Here’s an overview of how it works:
Two exposures: The photographer takes two photos of the same scene – one using only the available ambient light (usually from windows) and another using flash to illuminate the interior.
Blending: The two exposures are then blended together in post-processing software like Photoshop.
The photographer selects the best parts of each image (e.g., the well-exposed interior from the flash photo and the natural light from the ambient photo) and combines them to create a final, balanced image.
Have You Ever Thought To
Outsource Photo Editing?
Try it today with 10 free edits from three professional photo editors.

Gear and Camera Settings for Flambient Real Estate Photography

The following provides additional details on how to shoot this method of real estate photography, including suggested gear and camera settings.
Gear
- Camera: A DSLR or mirrorless camera with manual controls is ideal
- Lens: A wide-angle lens is best for capturing interiors
- Flash: An external flash is preferred, as it allows for more control over lighting
- Tripod: A tripod will help keep your shots steady and consistent
Camera Settings
- Mode: Manual mode for full control over exposure settings
- Aperture: Start around f/8 and adjust as needed
- ISO: Keep it low (100-400) to minimize noise
- Shutter speed: Adjust for the ambient light exposure; a faster shutter speed for flash exposure
- White balance: Set it manually or use a gray card for accurate color representation
How to Shoot Flambient Photography – The Shooting Process


The following is a little more detail on how to shoot flambient photography in real estate situations.
Ambient exposure: Take a photo using only the available ambient light. Adjust your shutter speed until the scene is exposed correctly, even if the interior is slightly underexposed.
Flash exposure: Turn on your flash and position it off-camera, ideally bounced off the ceiling or a wall for softer light. Adjust the flash power and shutter speed until the interior is well-lit, paying attention to avoiding harsh shadows and blown-out highlights.
You may need to take multiple flash exposures with different power settings.
Optional: Window pull: If windows are in the scene, take an additional exposure focused on the view outside. This will help ensure the windows are correctly exposed in the final image.
When learning how to shoot flambient photos, here are two additional issues to keep in mind:
- First, the weather and time of day for the shoot matter. A clear, sunny day is best, typically in the morning or late afternoon. Check the position of the property in relation to the sun before your shoot. Bad weather will make taking the window view shots difficult.
- A second issue is the possibility of flash reflection on the window glass. To overcome this issue, change the angle of the flash until you get a glare-free result. Remember, some of the glare spots will be removed in post-processing.
Speaking of post-processing, editing flambient photos can take some skill and be time-consuming. So, we have a final recommendation for you.
High-Quality & Consistent
Real Estate Photo Editing
Hire a dedicated editor with performance metrics from $7/hour.
Trust PhotoUp to Edit Your Flambient Photos
PhotoUp is the industry leader for real estate photo editing, including flambient photography.


You can trust their highly skilled editors to save you valuable hours while delivering outstanding results on your flambient images.
In addition to editing your flambient photos, PhotoUp’s experienced photo editors can help remove reflections and glare from glass surfaces as well as editing for the following issues:
- Improper exposure levels and color correction
- Blurred images due to camera shakes
- Harsh shadows, lack of light, etc.
- Noise reduction and image sharpening
- Lawn greening and sky replacements
- Twilight and day-to-dusk editing
- HDR editing
- Clutter and advanced object removal
- Line and angle corrections
- And much more!
Even better, PhotoUp’s turnaround time is superb, and their prices are incredibly affordable.
Turnaround time is usually 12-24 hours, and editing costs start at $1.10 per image, depending on your subscription and the complexity level of the edits needed.
You might also want to consider their dedicated photo editor services, allowing you to use the same editor or a team of dedicated editors for consistency, branding, and outstanding image quality each time.
Browse Top Dedicated
Real Estate Photo Editors
Ready-to-hire editors for real estate photo editing, and more.
A Fast and Easy Ordering Process
It’s extremely easy to work with PhotoUp.
First, sign up for a free PhotoUp account – it takes less than a minute.
When done, upload your images, select your export setting and turnaround time, and provide any other instructions.
When your photos are finished, download your edited images, and that’s it!
PhotoUp Real Estate Photo Editing Uploader Demo
Take a look at our real estate photo editing uploader demo to see how simple this is:
As simple as that!
A Complete Real Estate Marketing Partner
While PhotoUp excels at photo editing, they’re also a leading real estate marketing company, offering the most advanced and effective marketing tools, including the following:
- Virtual staging
- Virtual house tours
- Video editing
- Single property websites
- Custom websites
- Floor plans
- Property flyers
- House portraits
- Virtual assistants
- And more!
You owe it to yourself to explore all that PhotoUp offers. You and your customers will be glad you did.
Sign up for a free PhotoUp account today. As a bonus, you’ll receive 10 free credits, which you can use on any of our services!
We hope this blog post showed you how to shoot flambient photography for real estate. If you enjoyed this article helpful, you might want to read some of the following related posts:

