Table of Contents
- Why Do Images Get Distorted When Scaling Them?
- 4 Image Scaling Techniques
- How to Scale an Image in Photoshop Without Distorting
- Save Time With PhotoUp’s Professional Photo Editors
Do you want to learn how to scale an image in Photoshop without distorting it?
Poorly scaled images can appear distorted and unrealistic, compromising the overall quality. As an experienced real estate photo editing service, we can show you some valuable techniques for scaling images correctly for different platforms.
Allow us to share 4 useful Photoshop hacks with you, ensuring your images are perfectly scaled without any distortion.
Why Do Images Get Distorted When Scaling Them?


Have you ever wondered why photos get distorted when you try to scale them in Photoshop? Well, it all comes down to the aspect ratio not aligning properly with the new dimensions.
When you scale an image, the pixels get stretched instead of increasing in value. This lack of maintaining the same ratio or proportions is what causes the annoying distortion.
Now that you know why scaling an image in Photoshop can distort it, let’s show you how to avoid this next.
4 Image Scaling Techniques
Resizing images in Photoshop without distortion is crucial for optimizing website loading time and capturing the viewer’s interest.
To achieve this, there are 4 quick and effective techniques available:
- Free Transform: Use the CMD/CTRL + T shortcut to rescale your images without losing quality
- Content-Aware Scale: Utilize this feature to intelligently adjust the size of your images while preserving important elements
- Crop Tool: Use this tool to trim and frame your images, focusing on the most captivating part
- Image Size Adjustments: Access the “Image Size” option under the “Image” tab to set new width and height values for your pictures
By adopting any of these methods, you can successfully enhance your real estate photos and headshots without compromising image quality.
How to Scale an Image in Photoshop Without Distorting
Let’s take a closer look at how to scale an image without distorting it using these tools. You can either watch the video or continue reading the text with the screenshots below:
1. Free Transform Technique
The Free Transform tool is a convenient way to resize pictures in Photoshop without distorting them. It works on individual layers, allowing you to modify their size without affecting the overall image.
Here’s how to use it:
Step 1. Start by Selecting the layer you want to edit in the Layers Panel.
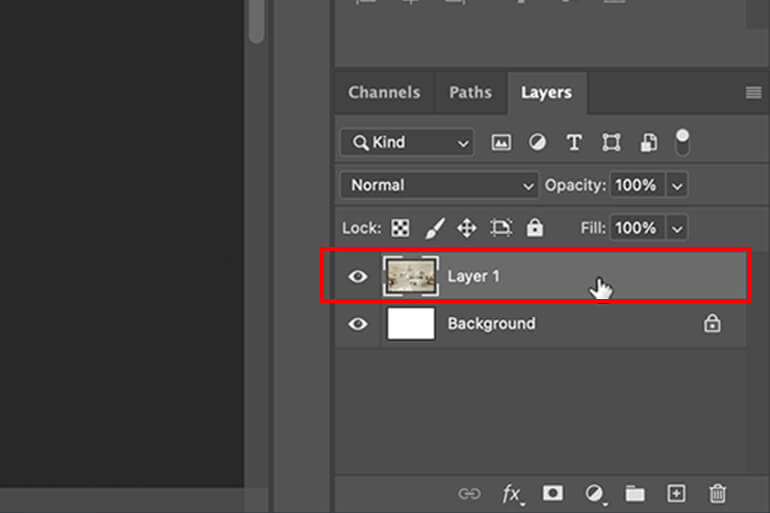
To preserve image quality, it’s recommended to convert the layer into a Smart Object.
You can do this by going to the Top Menu Bar, clicking on Layer, selecting Smart Objects, and choosing Convert to Smart Object.
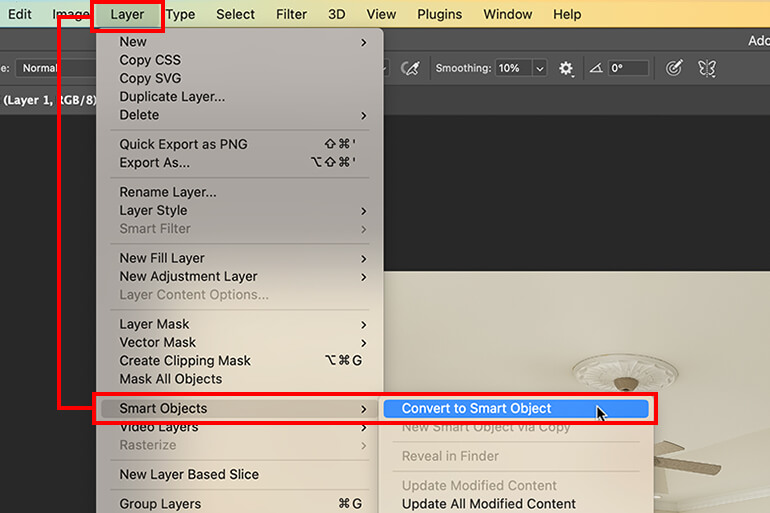
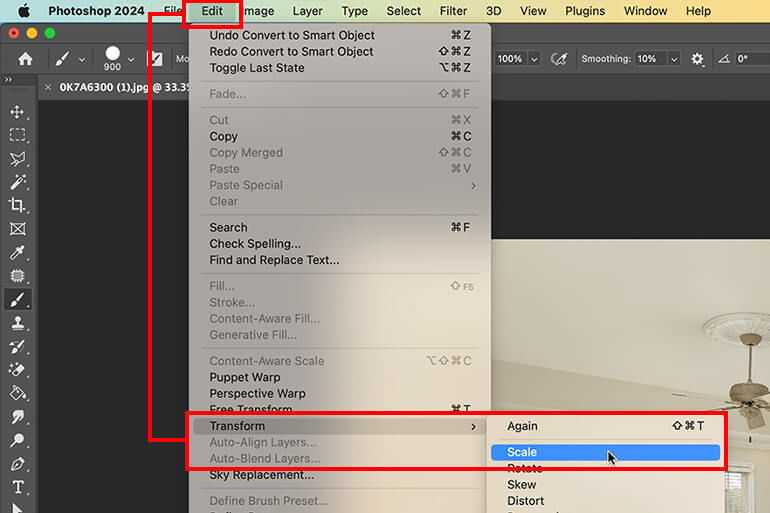
Next, scaling the image with the Scale Function ensures that the layer’s proportions remain intact, even when resizing. This eliminates any distortion in the height-to-width proportions.
Step 2. Access the top bar and click on Edit. From the drop-down menu, choose Transform and click on Scale. Alternatively, you can use the shortcut CTRL + T (Windows) or CMD + T (Mac).
Step 3. Once the Transform tool is active, a blue border will appear around the layer. Hover your cursor over the Blue Border and wait for an Arrow Icon to appear. Click on the Arrow and Drag to adjust the layer’s size.
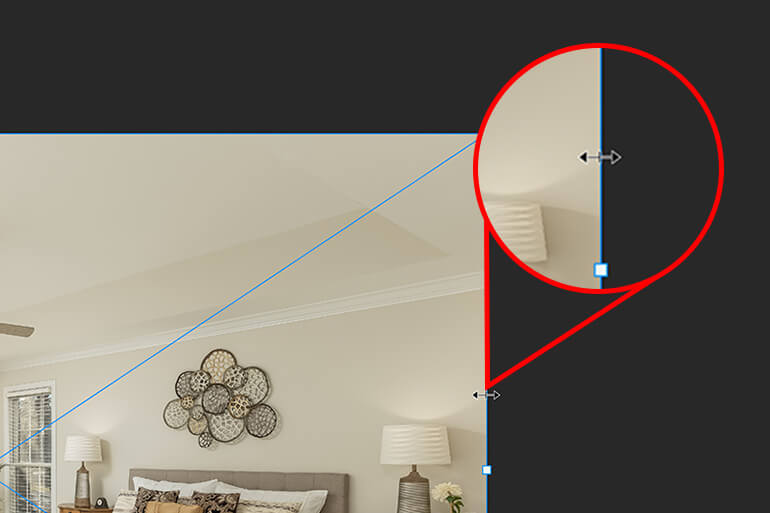
Step 4. Move the Edge to your desired dimensions. The layer’s size will increase or decrease accordingly.
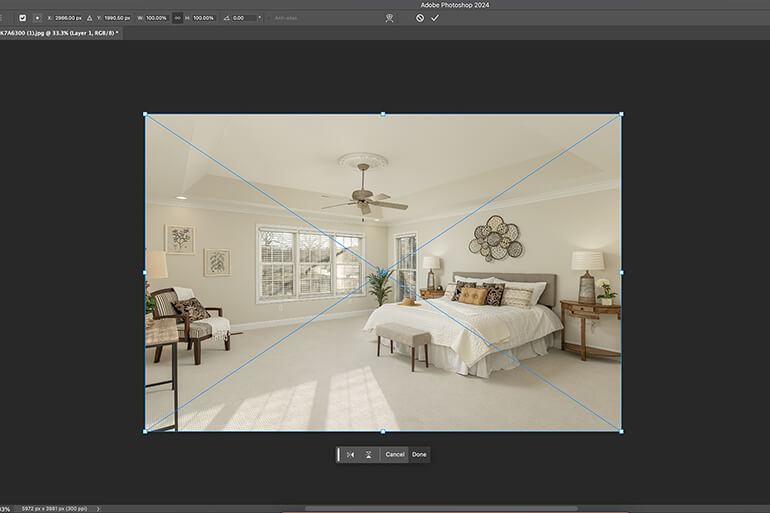
Step 5. Lastly, Release the cursor to finish resizing the picture.
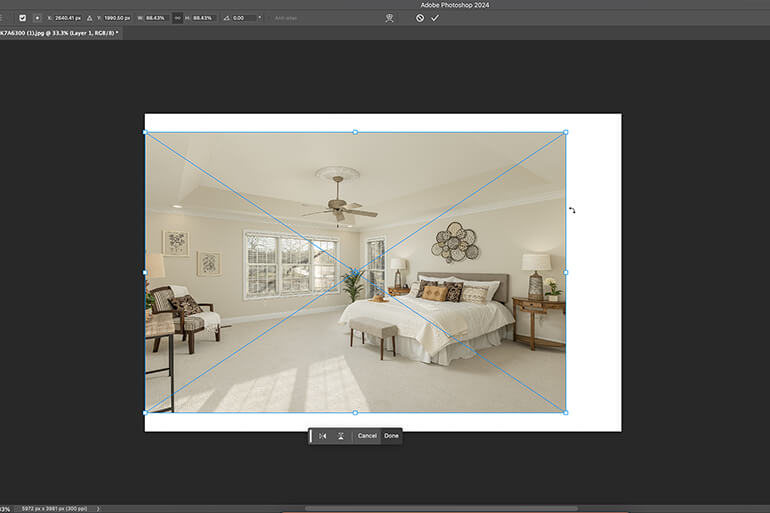
2. Content-Aware Scale Technique
Struggling to fill a frame without maximizing your real estate image’s pixels? The Content-Aware Scale command in Photoshop is an excellent tool for rescaling images without distorting or stretching them.
Let’s take a look at how to use this tool:
Step 1. Unlock the Layer in Photoshop. The Lock sign indicates that the layer is partially locked. Simply click on it to unlock the layer.
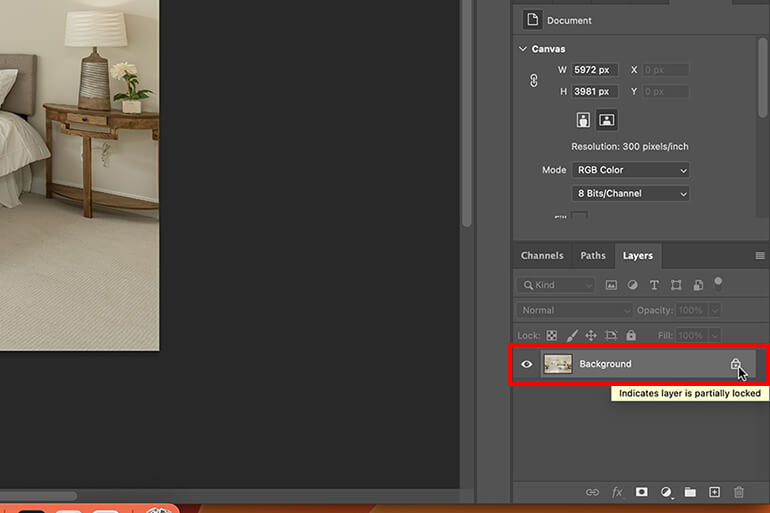
Step 2. Now, Select the object you want to scale. In this example, we are selecting the bed.
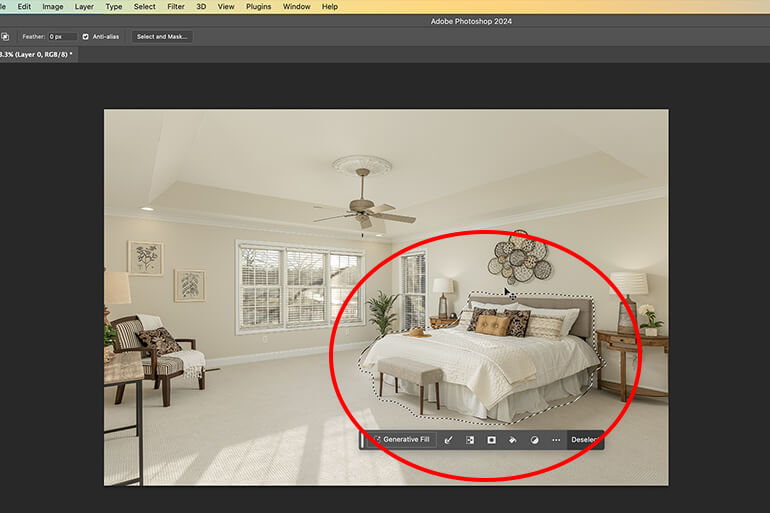
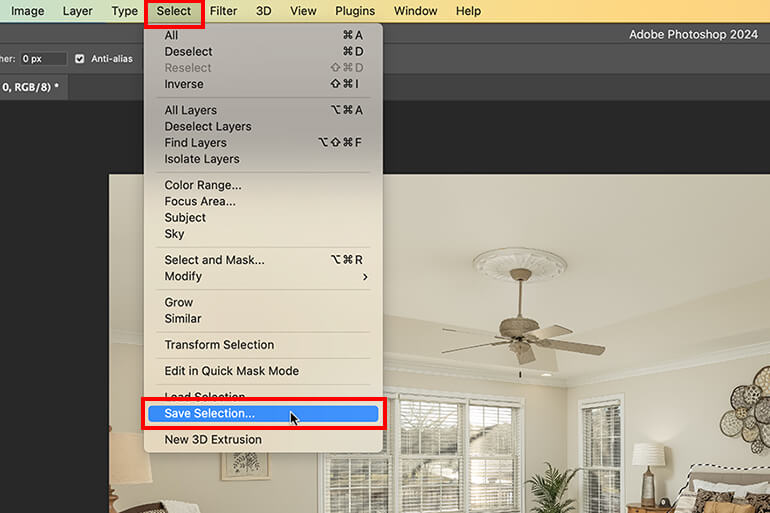
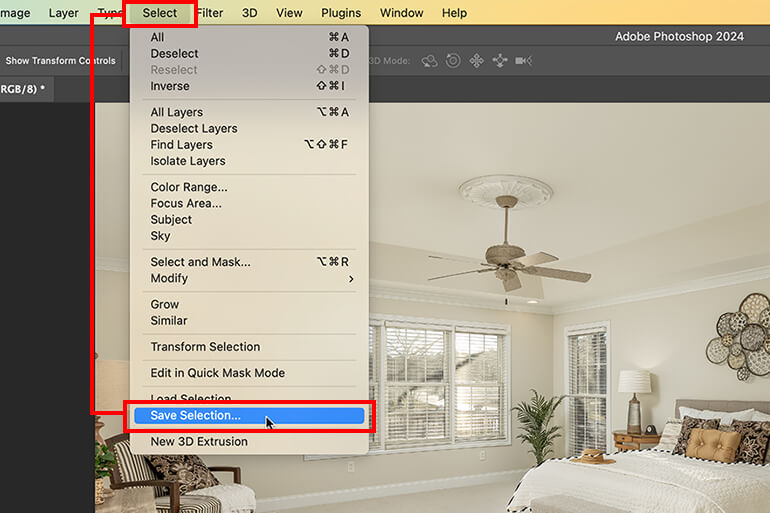
Step 3. In the next step, we want to save this selection, so navigate to Select > Save Selection.
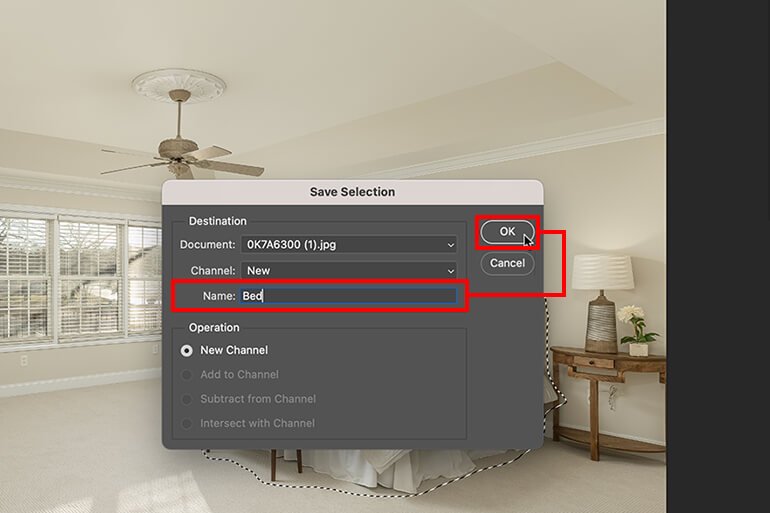
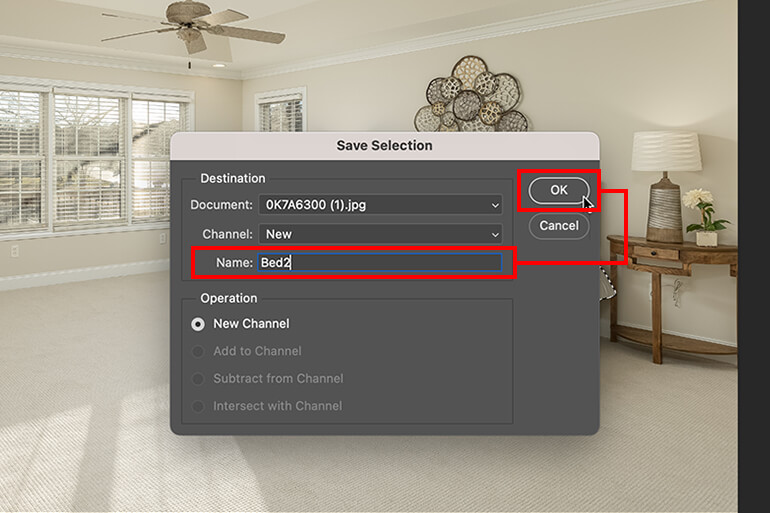
Step 4. Name your selection in the Save Selection window (let’s name it “Bed” for this example) and press OK. Make sure the New Channel option is marked in the Operation menu.
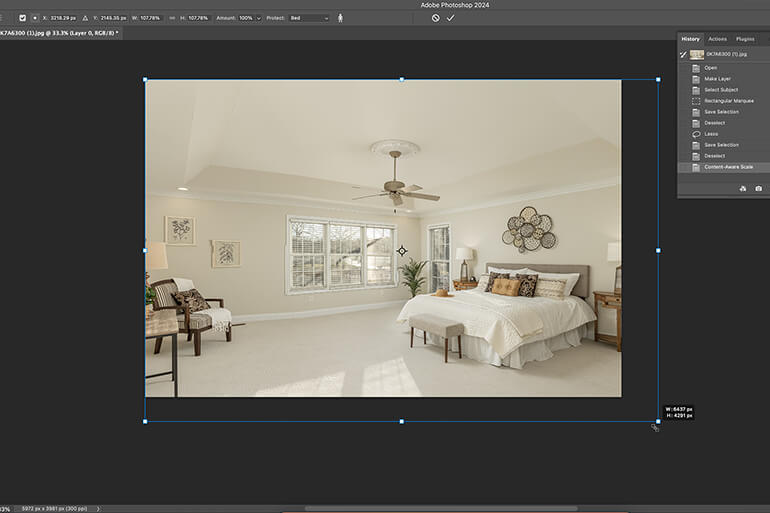
Step 5. Use the Transform Handles to scale your picture. Press Esc once you’re satisfied with the transformation.
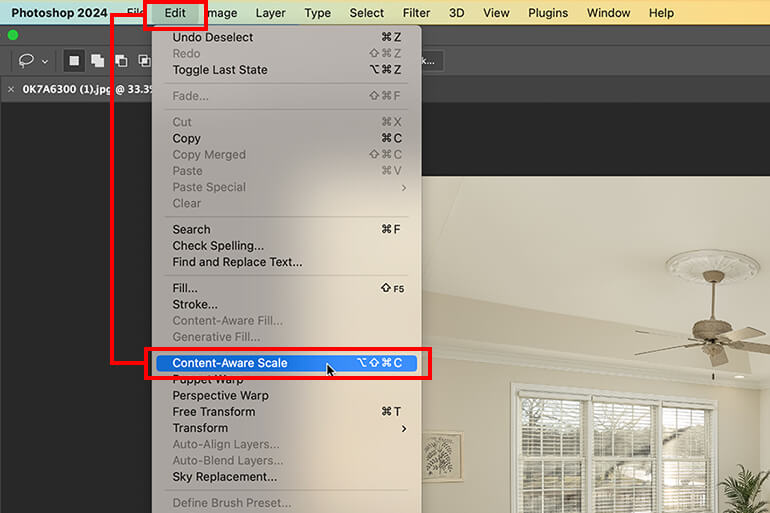
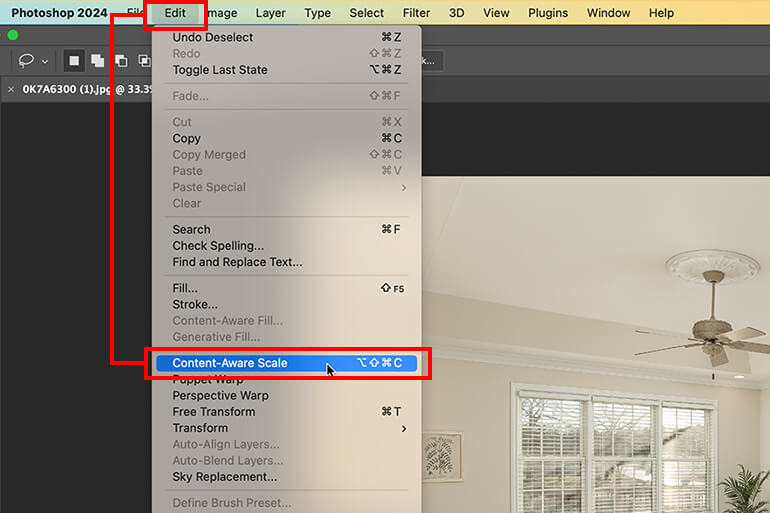
Step 6. Next, navigate back to Edit and select Content-Aware Scale.
Now, we need to protect important portions. If the selection still removes important parts, don’t worry! Adobe Sensei, Adobe’s artificial intelligence function, can come to the rescue.
Step 7. Once again, select and unlock the layer, and then navigate to the Properties panel.
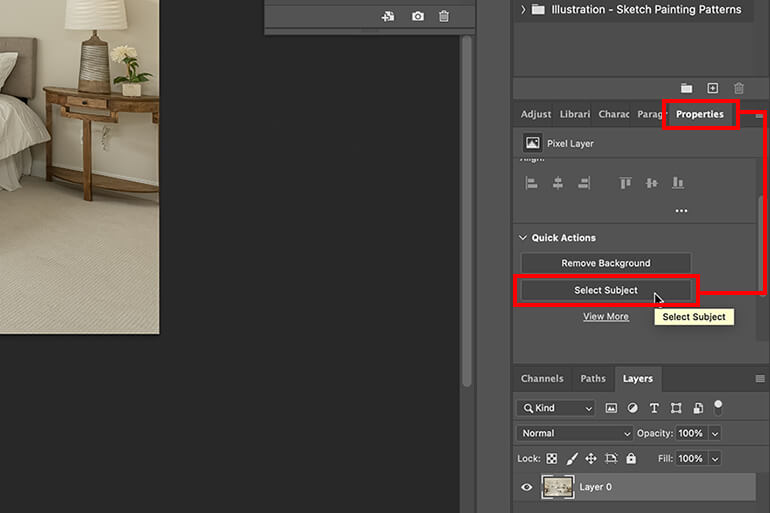
Step 8. Then, click the Select Subject button to automatically detect and select the subject using Adobe Sensei.
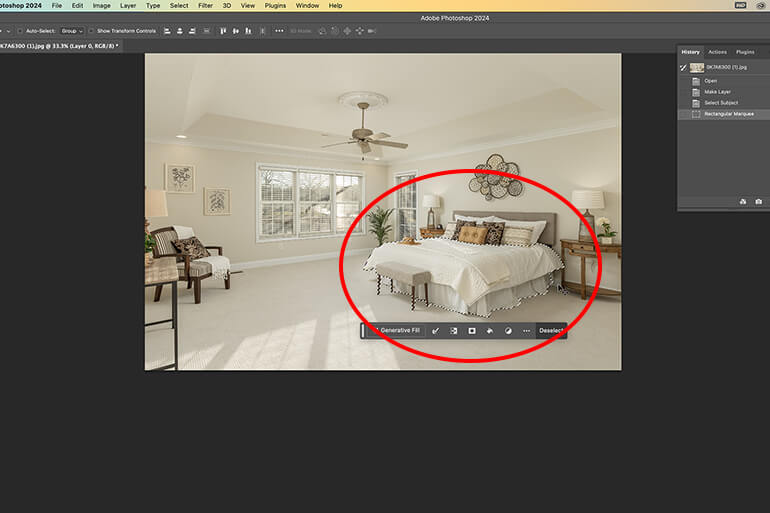
Step 9. Now, head to Select and click on Save Selection.
Step 10. Like in step 4, input a name for the selection in the Save Selection window and press OK. For example, type in “Bed2.”
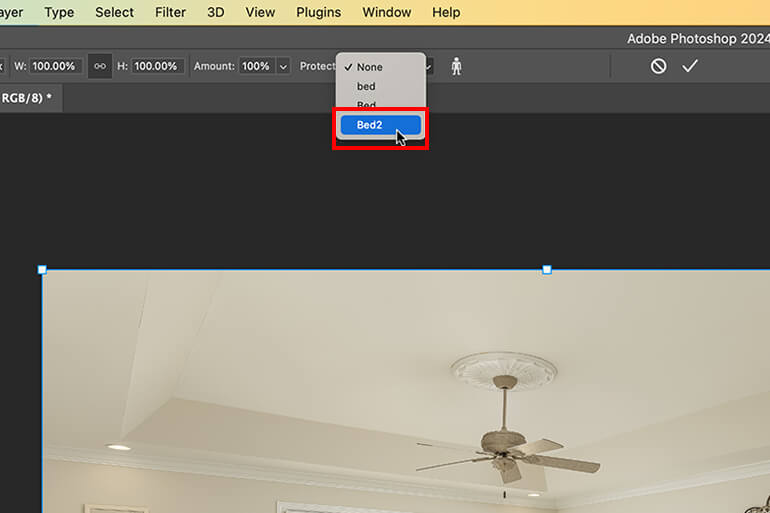
Step 11. Once you’ve saved the selection, press CTRL + D (Windows) or CMD + D to deselect the selection. And go back to Edit, then choose Content-Aware Scale.
Step 12. On the Options Bar, set the Protect Option to “Bed2.”
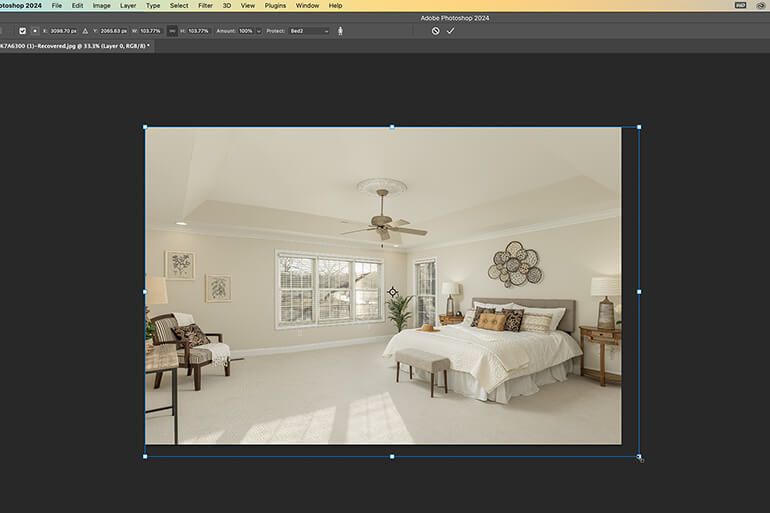
Step 13. Lastly, Scale the photo and observe how the subject maintains its appearance without distortion.
Have You Ever Thought To
Outsource Photo Editing?
Try it today with 10 free edits from three professional photo editors.
3. Crop Tool Technique
The Crop Tool is another quick and simple way to scale pictures in Photoshop without distorting them.
Let’s take a closer look at using the crop tool for image scaling:
Step 1. To begin, press the C key to open the Crop Tool, or click on the Crop symbol in the left menu.
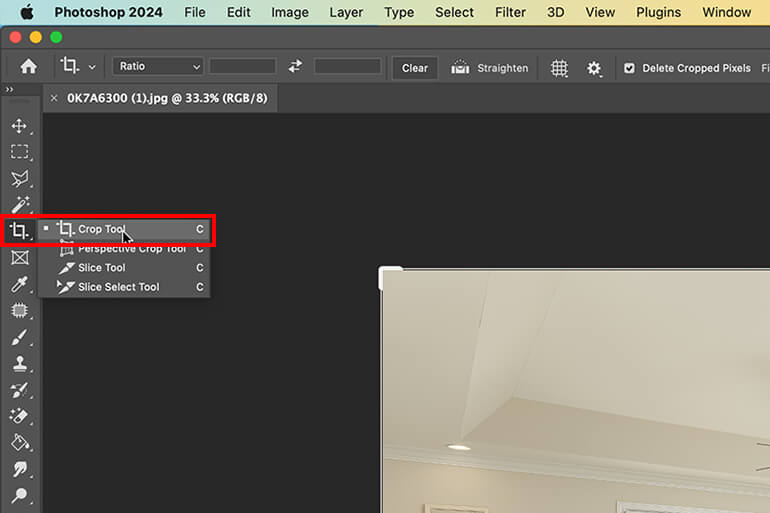
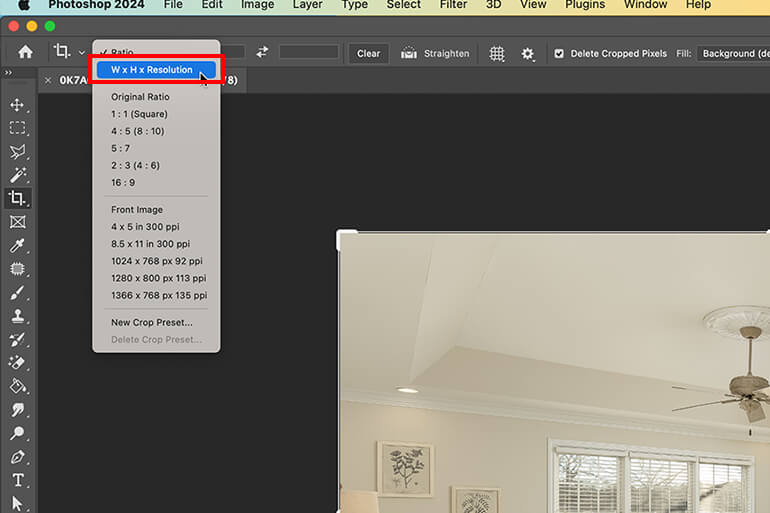
Step 2. Next, go to the Drop-Down menu next to the Tool Options panel and select W x H x Resolution instead of Original Ratio. This will allow you to adjust the crop setting.
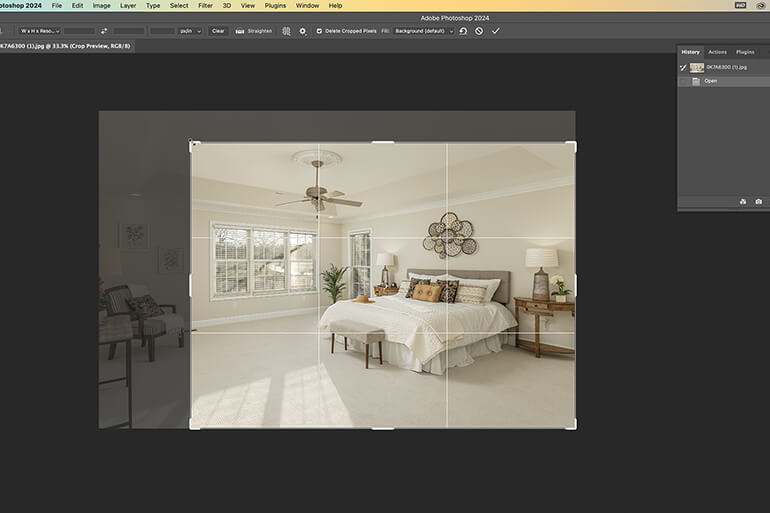
Step 3. Now comes the fun part – making precise adjustments through cropping. Start by Clicking and Dragging the tool over the portion of the picture you want to keep. If needed, you can continue dragging to fine-tune the selection from different sides.
Step 4. Once you’re satisfied with the new dimensions, you have two options. Either Double-Click the Cropped Section or click the green Commit current crop operation button to apply the changes.
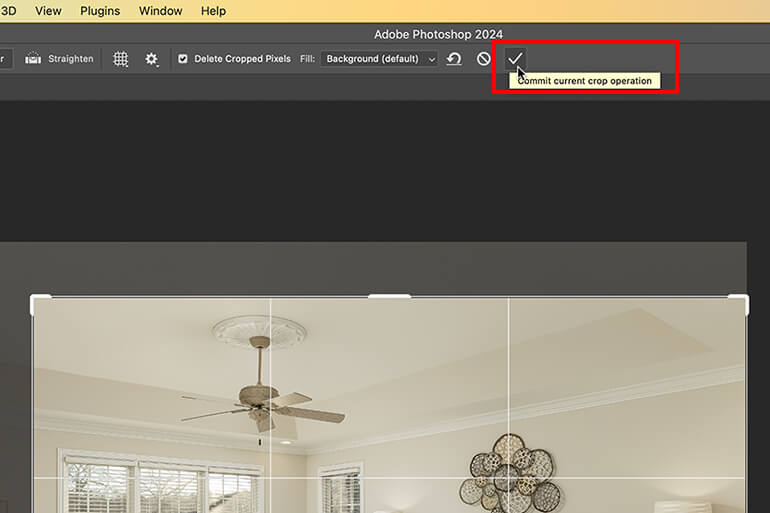
If you change your mind or want to start over, simply press the Esc key or click the red Cancel button to cancel the crop selection.
Cropping pictures in Photoshop has never been easier. Give it a try and watch your images scale without any distortion.
4. Image Size Adjustments Technique
You can also resize real estate images quickly using the Image Size Adjustments function. This method ensures precise enlargement without distortion.
Here’s how you do it:
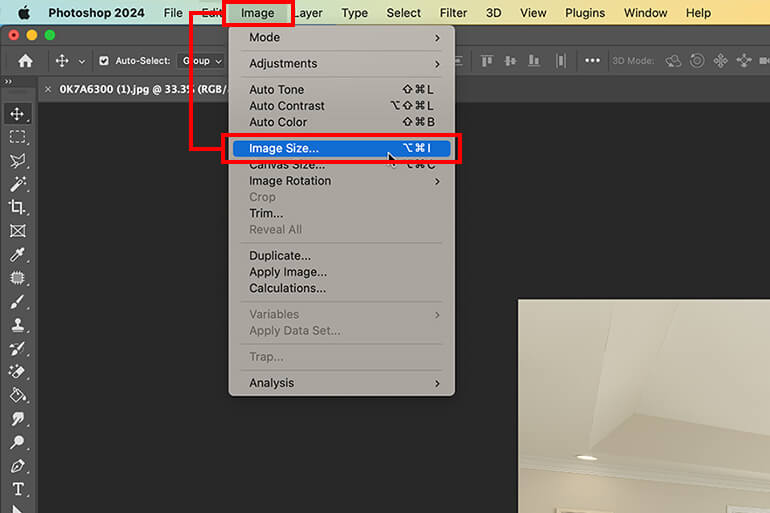
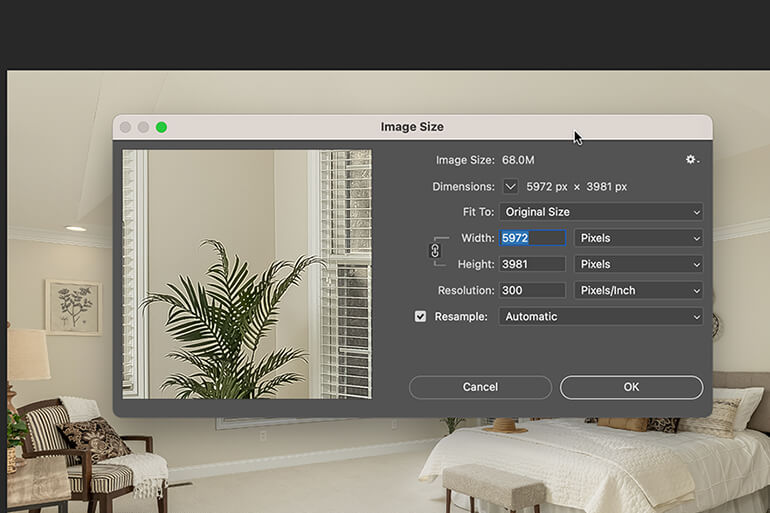
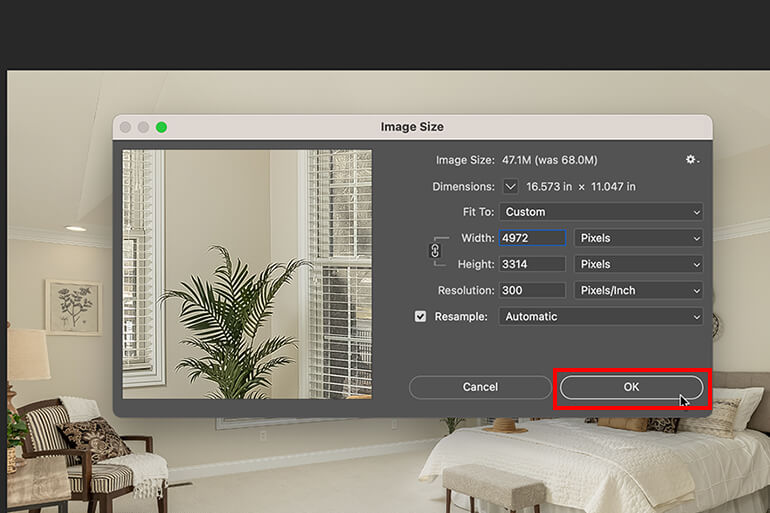
Step 1. Open the photo and go to the top menu bar. Then, click on Image and choose Image Size. Alternatively, press Alt + CTRL + I (Windows) or Opt + CMD + I (Mac).
Step 2. In the Image Size window, you’ll find options for file size, pixel dimensions, and image resolution. Modify the measurement by adjusting the Dimension Box.
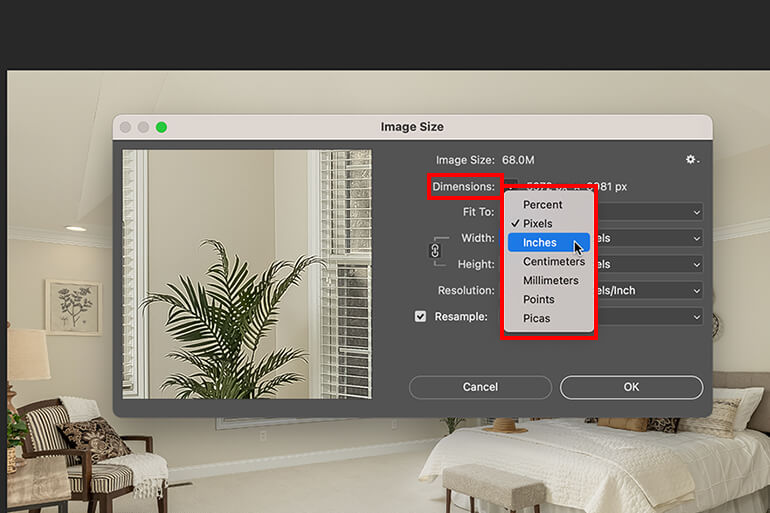
Step 3. Click on the arrow beside Dimensions to change the Dimension Setting to inches or centimeters from the drop-down menu.
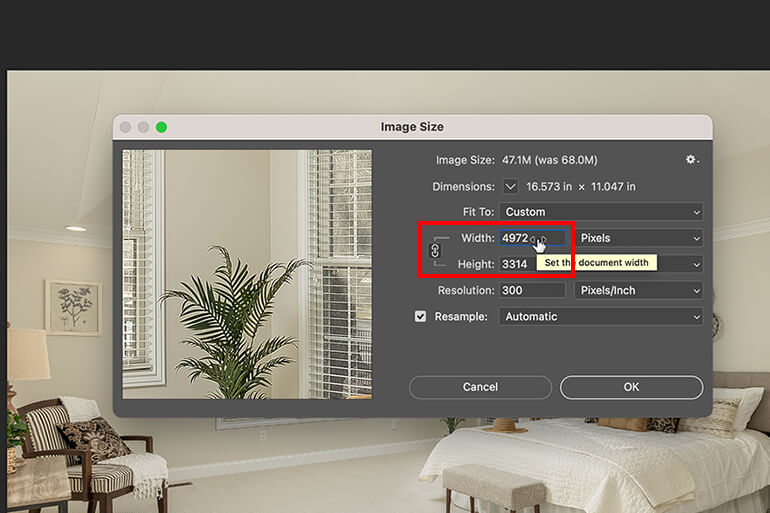
Step 4. Now, enter the desired Width and Height values.
Step 5. Ensure the Constrain Proportions checkbox is selected to maintain the aspect ratio and prevent stretching or distortion. If distortion is not a concern, you can uncheck the Constrain Proportions checkbox or click the chain icon.
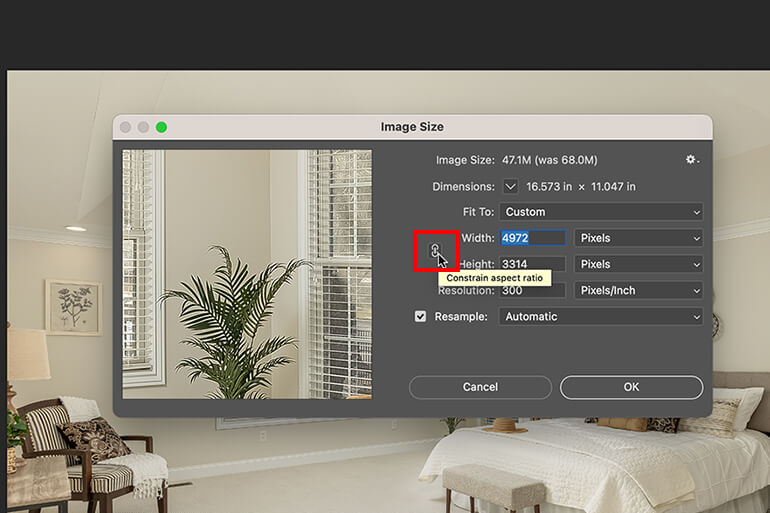
Step 6. Finally, click OK to allow Photoshop to rescale the image without distortion.
And that’s it!
You’ve now successfully scaled an image in Photoshop without distortion using 4 different techniques.
That said, let’s take a look at an even easier solution—to let a professional service edit your images for you.
Have You Ever Thought To
Outsource Photo Editing?
Try it today with 10 free edits from three professional photo editors.
Save Time With PhotoUp’s Professional Photo Editors
Are you tired of spending precious time on photo editing? Look no further! At PhotoUp, we’ve got your back!
Our team of professional real estate photo editors is here to take the editing burden off your shoulders, starting at an affordable price of $1.10 per image with various subscription options.


With over a decade of experience and a global network of skilled editors, PhotoUp delivers unbeatable quality, exceptional service, and competitive pricing.
Whether you need basic touch-ups or intricate edits, our editors guarantee top-notch results that will truly impress.
Our skilled photo editors can help with the following issues:
- Improper exposure levels
- Harsh shadows, lack of light, etc.
- Blurred images that were taken without a tripod
- Images that need cropping or other effects
- Lawn greening and sky replacements
- Twilight editing
- Clutter and object removal
- Line and angle corrections
- And much more!
Browse Top Dedicated
Real Estate Photo Editors
Ready-to-hire editors for real estate photo editing, and more.
There’s more…
A Complete Real Estate Marketing Partner

Except for photo editing, PhotoUp also offers additional real estate marketing services such as:
- Virtual staging
- Virtual house tours
- Video editing
- Real estate photographer websites
- Single property websites
- House portraits
- Floor plans
- Property flyers
- Virtual assistants
- And more.
We have everything you need to enhance and market real estate listings under one roof!
Best of all, getting started using PhotoUp’s photo editing service is super easy.
All you need to do is sign up for a free PhotoUp account, upload your images, choose export setting and turnaround time, and that’s it.
So get started today and let PhotoUp help you create amazing visuals effortlessly!
We hope this blog post helped you learn how to scale an image in Photoshop without distorting it. Before you go, make sure to check out the following resources as well:


