


Table of Contents
- Why Resize Images?
- Understanding How Resolution Relates to File Size
- How to Resize an Image in Photoshop
- How to Keep the Image’s Original Size File Intact
- Need Help With Photo Editing? Choose PhotoUp!
Do you want to learn how to resize an image in Photoshop? Resizing images is a fundamental skill that every photographer and graphic designer should master, primarily because it serves multiple purposes.
From ensuring your images fit specific format requirements online, to preparing high-quality prints, knowing how to properly adjust the size of your photos without sacrificing quality is essential.
In this guide, we’ll show you how to resize an image in Photoshop. We’ll also cover why this is needed, how image resolution relates to file size, what resolution to use for online and print media, and more.
Why Resize Images?
Resizing images can help you optimize your photos for various outputs.
For instance, large, high-resolution images are perfect for print but can slow down website loading times. And as we know, a slow-loading website will lose traffic and potential new leads for your business.
On the other hand, using images with small file sizes or low resolution when, for example, printing a brochure will make your images look blurry and pixelated. Not a flattering look!
If you’d need to adjust a pixelated image, you can check out our blog post on how to fix pixelated pictures in Photoshop.


In summary, resizing images to fit the requirements of the platform or medium ensures that your work is shown to its best advantage everywhere it appears.
Understanding How Resolution Relates to File Size
Resolution refers to the amount of detail an image holds and is typically measured in pixels per inch (PPI).
High-resolution images have more pixels and are therefore larger in file size, which is ideal for print where clarity is crucial.
On the web, however, high resolution can mean unnecessarily long download times, so a balance must be struck between quality and efficiency.
Resolution for Online vs Print Images
What resolution should you use for online and print images?
For online use, 72 PPI is standard, whereas printing requires a much higher resolution to maintain image quality—usually 300 PPI.
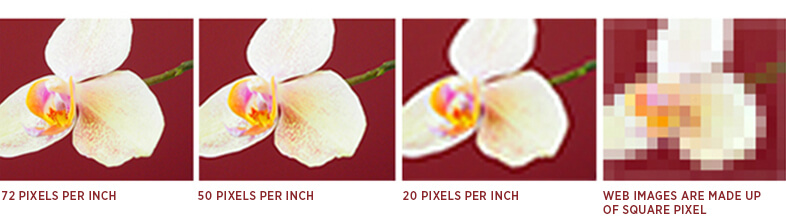
Remember, increasing resolution can’t add detail beyond what’s in the original file, so always start with the highest quality image you can. Editing in RAW format will help keep the original file size of your image.
Have You Ever Thought To
Outsource Photo Editing?
Try it today with 10 free edits from three professional photo editors.

How to Resize an Image in Photoshop (5 Simple Steps)
Whether you’re preparing images for the web or print, resizing them in Photoshop is a vital skill that’s easy to pick up. Let’s take a look at how to resize an image in Photoshop. Luckily, this is a super easy process.
You can either watch the video tutorial or continue reading the text below:
Follow these simple steps:
Step 1. To get started, open your image in Photoshop and go to File. Open to choose your image file.
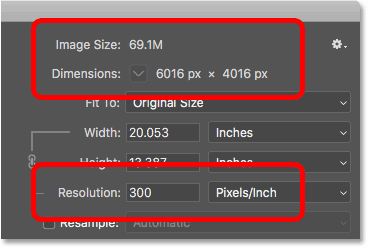
Step 2. Next, in the top menu, navigate to Image > Image Size to open the Image Size dialog box.
Step 3. In the Image Size dialog box, you can adjust the Width and Height of the image. Make sure the chain link icon is clicked to maintain the aspect ratio of your image. If you don’t want to maintain the aspect ratio, you can just click the link icon to unchain it.
Also, if your image has layers with styles applied to it, select Scale Styles from the gear icon to scale the effects in the resized image. This option is available only if you select the Constrain Proportions option.
Step 4. In the same dialog box, choose a resampling method, for example, Bicubic Sharper for reducing size or Bicubic Smoother for enlarging. Once you’re satisfied with the new size, click OK to apply the changes.
Step 5. To save your image in your resized format, go to File > Save As and click Save.
And that’s it! You’ve now learned how to easily resize an image in Photoshop.
How to Keep the Image’s Original Size File Intact
When resizing images, it’s always good practice to preserve the original file.
To create a new, smaller file and keep the original size file intact, simply click File › Export As.
In addition, the Export function also lets you adjust pixels, scale down by percentage, or export as a JPEG with decreased quality.
With the power to control resolution and dimensions at your fingertips, you’re now well-equipped to ensure your photographs look perfect, no matter where they’re displayed. Remember, practice makes perfect!
The Ultimate All-in-One
Real Estate Photographer Business Platform
Grow a successful real estate photography business with PhotoUp.
Need Help With Photo Editing? Choose PhotoUp!
With these techniques, you’ll be able to resize images in Photoshop and optimize them for various outputs.

But let’s face it, editing photos can take up precious time and effort. And maybe you need help with more advanced editing as well? No matter the complexity level, PhotoUp has your back!
Our team of professional photo editors is here to take the burden of editing off your hands, starting at the incredibly affordable price of $1.10 per image, depending on your subscription and complexity level.
Browse Top Dedicated
Real Estate Photo Editors
Ready-to-hire editors for real estate photo editing, and more.
With over 10 years of experience and a global network of talented photo editors, PhotoUp offers unbeatable quality, exceptional service, and competitive pricing.
Whether you’re looking to outsource real estate photo editing or any kind of editing, rest assured that our editors will deliver nothing less than the highest quality for your photos.
Photo Editing Services
Here are some of PhotoUp’s photo editing services:
Real Estate Marketing Services
Except for photo editing, PhotoUp also offers additional real estate marketing services such as:
- Virtual staging
- Virtual house tours
- Video editing
- Real estate photographer websites
- Single property websites
- House portraits
- Floor plans
- Property flyers
- Virtual assistants
- And more.
We have everything you need to enhance and market real estate listings in one user-friendly platform!
Best of all, getting started using PhotoUp’s photo editing service is super easy.
All you need to do is sign up for a free PhotoUp account, upload your images, choose export setting and turnaround time, download your images, and that’s it.
Let PhotoUp’s professional editors help you edit your photos and take your photography to the next level!
We hope this blog post helped you learn how to resize an image in Photoshop. Before you go, you may want to check out the following resources as well:

