Table of Contents
- What Does It Mean to Merge Layers in Photoshop?
- When Is It Useful to Merge Layers?
- How to Merge Layers in Photoshop (3 Simple Methods)
- Good Tips When Merging Layers
- Need Help With Photo Editing? Choose PhotoUp!
Do you want to learn how to merge layers in Photoshop? It’s super easy!
Merging layers is a fundamental skill in Photoshop that can significantly streamline your workflow, especially for real estate photographers and photography enthusiasts.
In this guide, we’ll explore what merging layers entails, when it’s useful, and how to merge layers in Photoshop effectively using 3 simple methods.
Let’s get started!
What Does It Mean to Merge Layers in Photoshop?

Merging layers in Photoshop means combining multiple individual layers into a single layer, which streamlines your workspace and enhances the efficiency of your editing process.
Each layer typically represents a different element of your design, such as images, text, or effects, and merging them blends these components together, creating a cohesive final product.
This action not only simplifies the Layers panel—making it easier to navigate and edit—but also can improve the performance of the software when handling large files.
By merging layers, you effectively “flatten” your image while still retaining the essential visual elements, allowing for a more straightforward workflow during the finishing stages of your project.
When Is It Useful to Merge Layers in Photoshop?
So when is it useful to merge layers in Photoshop? It is particularly useful when:
- Finalizing an Image – Once you’re satisfied with your edits, merging layers can help lock them in
- Reducing File Size – Photoshop files can become quite large with multiple layers. So merging layers helps reduce the file size, making it easier to store and share
- Better Use of the Camera Raw Filter – The Camera Raw filter can only be applied to one layer at a time. To edit all your photos together, you should combine the layers first
- Simplifying Your Workflow – With fewer layers to manage, navigating your project becomes more straightforward, allowing you to focus on your creative work. For example, it allows you to merge several background layers into a new one to create a single background layer that’s easier to work with than many linked layers
As you can see, knowing how to merge multiple layers in Photoshop is a valuable skill for organizing your editing workflow and reducing your overall file size.
Now that you know when it’s useful to merge layers, let’s take a look at how to do this effectively in Photoshop.
Have You Ever Thought To
Outsource Photo Editing?
Try it today with 10 free edits from three professional photo editors.
How to Merge Layers in Photoshop (3 Simple Methods)
There are many ways to work with merging layers in Photoshop, and we’ll show you 3 simple methods, starting with the Merge Layers Tool.
You can either watch the video tutorial or continue reading the text below:
Method 1: The Merge Layers Tool
This is how you merge layers in Photoshop using the Merge Layers Tool:
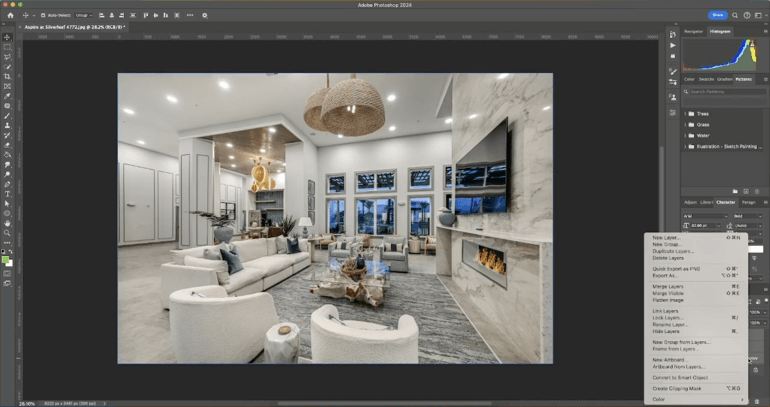
Step 1. To get started, select the Layers you want to merge. You could do this by holding down the Ctrl key on Windows or Cmd key on Mac and clicking on each layer in the Layers Panel.
Step 2. Next, right-click on one of the selected layers and choose Merge Layers from the context menu. This will combine the selected layers into a single layer.
Method 2: Keyboard Shortcuts
One of the easiest ways is to use shortcuts. This is what to do:
Step 1. Select the Layers you want to merge as described above.
Step 2. Then, press Ctrl + E on Windows or Cmd + E on Mac to merge the selected layers quickly.
Method 3: Clipping Mask
You can also merge layers using a Clipping Mask like this:
Step 1. To merge using a Clipping Mask, create a Clipping Mask by placing the layer you want to clip above the layer you want to use as a mask.
Step 2. Next, right-click on the top layer and select Create Clipping Mask. This will clip the top layer to the shape of the layer below.
Step 3. Lastly, to merge these layers, select both layers and use the Merge Layers Tool or the Ctrl + E on Windows or Cmd + E on Mac shortcut.
For more information about Clipping Masks, you can check out our guide on how to make a clipping mask in Photoshop for background removal.
And that’s it! You’ve now learned three simple methods to merge layers in Photoshop.
Good Tips When Merging Layers


When working with merging layers, there are some best practices to consider:
- Always Duplicate Layers – Before merging layers in Photoshop, duplicate your layers so you have a backup in case you need to make adjustments later. Simply right-click on the layer and select “Duplicate Layer”
- Use Smart Objects – Convert layers to Smart Objects before merging. This way, you can retain the ability to edit them non-destructively. Right-click the layer and select “Convert to Smart Object.” Learn more in our blog post on how to use smart objects in Photoshop
- Use Adjustment Layers – Use Adjustment Layers for color correction and other effects. These can be merged without affecting the underlying layers, preserving your original content
- Check Your Layers – Ensure that all necessary adjustments are completed before merging layers. Once merged, reversing the process can be complex and time-consuming
- Save Your Work – This might seem obvious but regularly save different versions of your project. This will allow you to revert to earlier stages if needed. Use “File > Save As” to create new versions
Overall, merging layers in Photoshop is a powerful tool that can help real estate photographers and photography enthusiasts manage their projects more efficiently.
Whether you’re merging layers to finalize an image or reduce file size, knowing the various methods available will enhance your Photoshop skills. So, follow these steps, and start creating stunning, organized images!
Have You Ever Thought To
Outsource Photo Editing?
Try it today with 10 free edits from three professional photo editors.
Need Help With Photo Editing? Choose PhotoUp!
With these techniques, you’ll be able to merge layers in Photoshop and organize your editing process.


But let’s face it, editing photos can take up precious time and effort. And maybe you need help with more advanced editing as well? No matter the complexity level, PhotoUp has your back!
Our team of professional photo editors is here to take the burden of editing off your hands, starting at the incredibly affordable price of $1.10 per image, depending on your subscription and complexity level.
With over 10 years of experience and a global network of talented photo editors, PhotoUp offers unbeatable quality, exceptional service, and competitive pricing.
Browse Top Dedicated
Real Estate Photo Editors
Ready-to-hire editors for real estate photo editing, and more.
Photo Editing Services
Here are some of PhotoUp’s photo editing services:
Whether you’re looking to outsource real estate photo editing or any kind of editing, rest assured that our editors will deliver nothing less than the highest quality for your photos.
A Complete Real Estate Marketing Partner


Except for photo editing, PhotoUp is a complete real estate marketing partner and also offers additional services such as:
- Virtual staging
- Virtual house tours
- Video editing
- Real estate photographer websites
- Single property websites
- House portraits
- Floor plans
- Property flyers
- And Virtual Assistants
We have everything you need to enhance and market real estate photography on one user-friendly platform!
How to Get Started
Best of all, getting started using PhotoUp’s photo editing service is super easy.
All you need to do is sign up for a free PhotoUp account, upload your images, choose export setting and turnaround time, and that’s it.
Your beautifully edited photos will be ready for download in only 12 to 24 hours!
PhotoUp Real Estate Photo Editing Uploader Demo
To see how easy it is to get started with PhotoUp, have a look at our real estate photo editing uploader demo:
As simple as that!
So sign up for a free PhotoUp account and let our professional editors help you edit your photos and take your photography to the next level!
For a limited time, you even get 10 free credits you can use on any of our services when you sign up for an account.
We hope this blog post helped you learn how to merge layers in Photoshop. If you found this post useful, you may also want to check out the following resources:


