


Welcome to PhotoUp! We are so happy to have you onboard.
If you’re looking to get started with PhotoUp’s real estate photo editing service and upload your first batch of images, this guide will help you navigate our software and the uploading process.
Don’t worry, it’s super quick and easy.
If you haven’t signed up to try our services yet, let’s start with a brief introduction to PhotoUp and our services.
What Is PhotoUp Real Estate Photo Editing?
PhotoUp—a company that has garnered significant attention for its real estate editing and marketing solutions has been an industry expert for over a decade.
Headquartered in Grand Rapids, Michigan, with offices in Cebu City, the Philippines, PhotoUp is the leading provider of real estate photo editing and virtual staging services.
We can help with basic and advanced editing such as:
- Brightness and color correction
- Vertical lines adjustments
- Advanced object removal
- Day-to-dusk conversion and twilight editing
- Lawn greening and sky replacements
- HDR editing
- Manual blending
- Flambient editing
- And much more!
PhotoUp can handle all types of editing – small, large, or complex. We got your back!
A One-Stop Shop for Real Estate Marketing
Additionally, PhotoUp is a one-stop shop for real estate marketing and also offers additional services such as:
- Virtual house tours
- Video editing
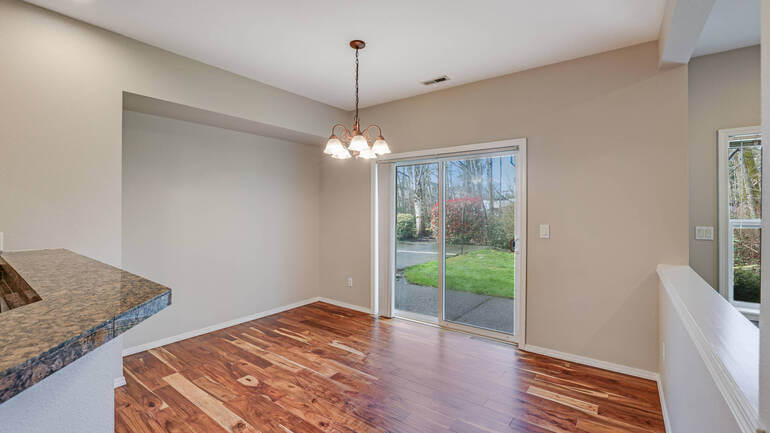
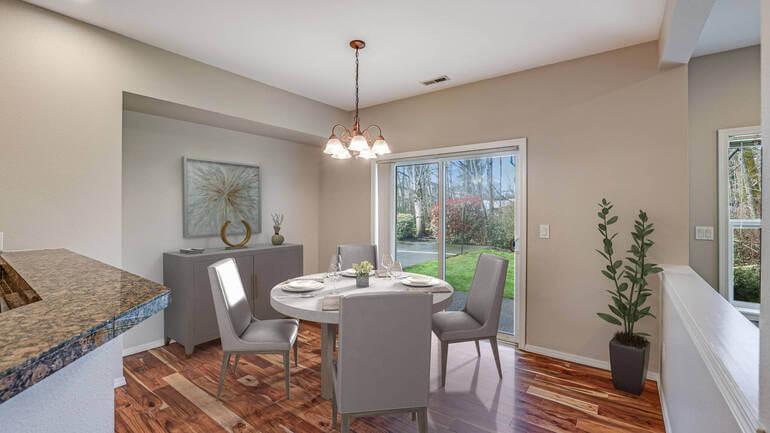
- Virtual staging
- Single property websites
- Custom websites
- Floor plans
- Property flyers
- House portraits
- Virtual Assistants
- And more!
With 12 years in the business and hundreds of editors, it’s hard to beat PhotoUp’s quality, service, and pricing.
According to their CEO, Kristian Pettyjohn, this is what makes PhotoUp stand out:
“I would say the three big areas that set PhotoUp apart from our competitors are: USA support, a focus on building software, not just services, and most recently the introduction of staffing, that is, having photographers work directly with their real estate photo editors.”
Kristian Pettyjohn, CEO of PhotoUp
For more information about the company’s leadership and background, check out this Interview With PhotoUp’s CEO – The Leading Real Estate Photo Editing Company in the US.
With that brief introduction, let’s get down to business and show you how to group images when uploading them to PhotoUp’s software.
How to Group Images When Uploading – PhotoUp Demo
If you’ve got a batch of images ready for upload, we’re here to guide you through the process of grouping them efficiently.
We have two simple methods to group your images using our uploader. The first one is the manual grouping feature, so let’s begin by taking a look at the manual grouping of images.
You can either watch the video demo or continue reading the text below:
Uploading Your Photos Using the Manual Grouping Feature
Use the manual grouping method when you have a mix of single photos and groups.
Step 1. Click the Create Group icon and hover over the Pencil icon to select the type of group.
Choosing Your Group Type
Depending on your needs, select from:
- HDR Grouping: Perfect for a bracket of images you wish to blend in HDR software like LR Infuse or Photomatix
- Manual Blending: Ideal for blending three or more images by hand in Photoshop. Note that this service is only available to members who have described their blending process via the intake form or additional emails
- Masking: Use this option to mask two images together in Photoshop, commonly used for window masking
- Panoramic Grouping: Choose this for stitching a series of images into one panoramic shot
- Floor Plans: For floor plans, all you need to do is send us a sketch, and we will create a 2D or 3D version of your floor plan
Choosing Add Ons
Now, let’s show you how to choose add-ons. In this example, we’ll use HDR.
Step 2. Hover over the Star icon on the right for Additional Options. For example, if you want window masking for an HDR group, check the HDR window masking checkbox.
Step 3. Finally, drag and drop the appropriate images into each created group. You can add as many groups as you need, and you can add or remove groups by clicking the X icon.
Step 4. Once everything is sorted, you’re ready to upload your photos!
Uploading Your Photos Using Auto Grouping
Let’s move on by showing you how to upload your photos using the Auto Grouping feature. This works best when uploading the same-sized group of photos in a batch.
Step 5. Click the Auto Grouping icon and select the number of photos per group. You can select (2, 3, 4, 5, up to 40 photos per group).
Step 6. Once you’ve chosen the amount of images to group, choose the Default Type of Group in the drop-down menu.
Step 7. Next, drag and drop your images into the uploader, or select them manually. The system will automatically group your photos. If needed, change the type of group by hovering over the Pencil icon.
Step 8. Lastly, add-ons can be requested by hovering over the Star icon, just as with the manual method.
Now, you’re ready to upload your photos and let our editors work their magic!
That’s all for grouping your photos. If you have further questions, feel free to contact us at support@photoup.net.
If you happened to land on this guide but still haven’t signed up with PhotoUp, sign up for a free account today, and get 10 free credits you can use on any of our services!
Our team of expert real estate photo editors will help take your images to the next level and save you valuable time you can use to shoot more properties and grow your business.
Happy Shooting!
We hope this guide helped you understand how to group images when uploading using PhotoUp’s software. Before you go, you may also want to check out the following resources:

