


Table of Contents
- Understanding the Luxury Aesthetic in Real Estate
- How to Edit Real Estate Photos for Luxury Listings
- Ensure Luxury Photos With PhotoUp’s Editing Service
Are you wondering how to edit real estate photos for luxury listings?
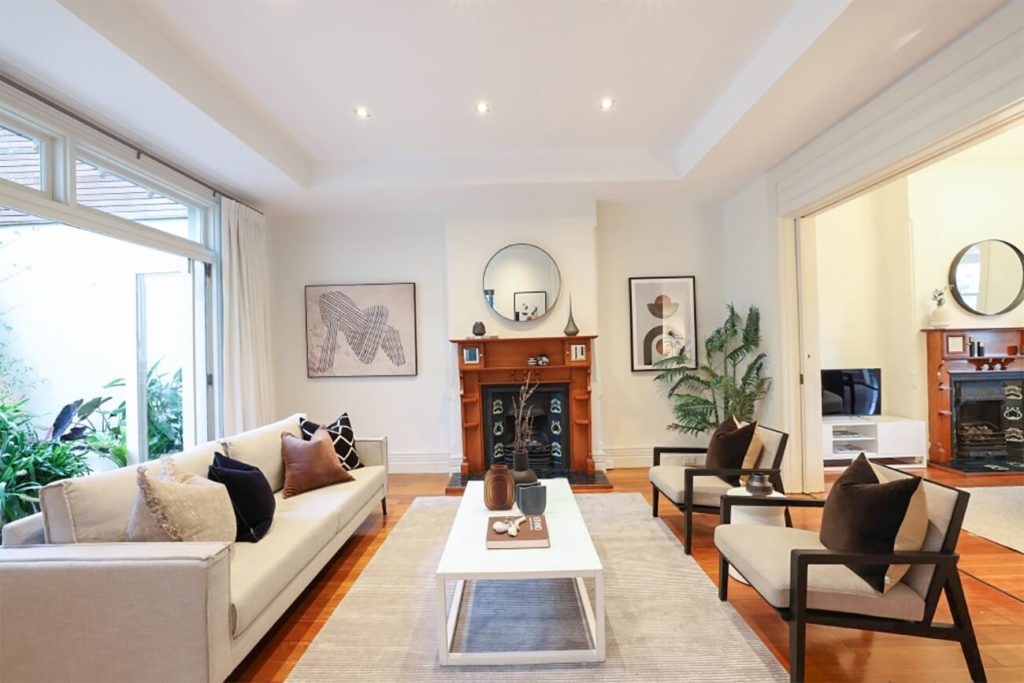
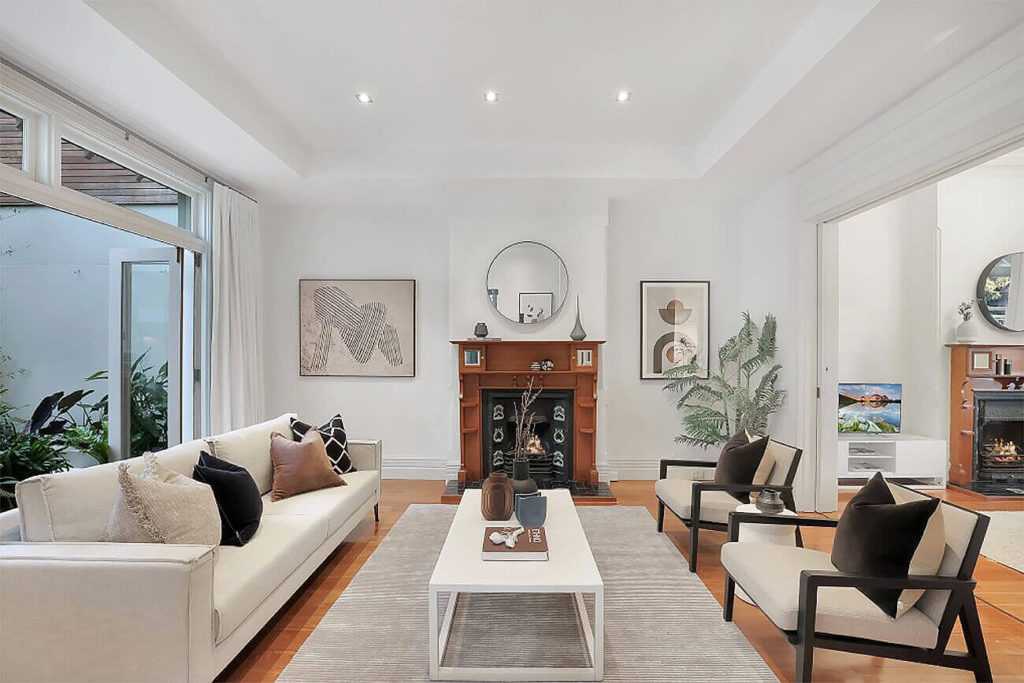
Luxury real estate photography requires a refined editing approach to showcase high-end properties in their best light. Unlike standard real estate listings, luxury homes demand extra detail, precision, and artistry to highlight their elegance, grandeur, and unique features.
In this guide, we’ll explore the essential steps to editing real estate photos for luxury listings, ensuring that your images captivate potential buyers and convey the sophistication of the property.
Let’s begin by discussing what represents a luxury aesthetic in real estate photography.
Understanding the Luxury Aesthetic in Real Estate

Before diving into the editing process, it is crucial to understand what sets luxury real estate photography apart.
Luxury homes often feature expansive interiors, high-end materials, custom architecture, and stunning outdoor spaces.
The goal of real estate photo editing should be to enhance these elements while maintaining a natural and inviting look. Over-processing can make images appear artificial, which can deter high-end buyers.
With this in mind, let’s show you how to ensure your real estate photos have that luxury glow with the help of some powerful editing techniques.
How to Edit Real Estate Photos for Luxury Listings
Here are 10 steps on how to edit real estate photos for luxury listings. By following these steps, you’ll ensure clear, well-lit, and breathtaking real estate photos that will appeal to high end buyers.
1. Organizing and Selecting the Best Shots

After capturing the images, the first step is to organize and select the best shots.
Luxury listings require a balance between wide-angle shots that showcase the entire space and close-ups that highlight intricate details.
Use a photo management tool like Adobe Lightroom to sort and rate your images before beginning the editing process.
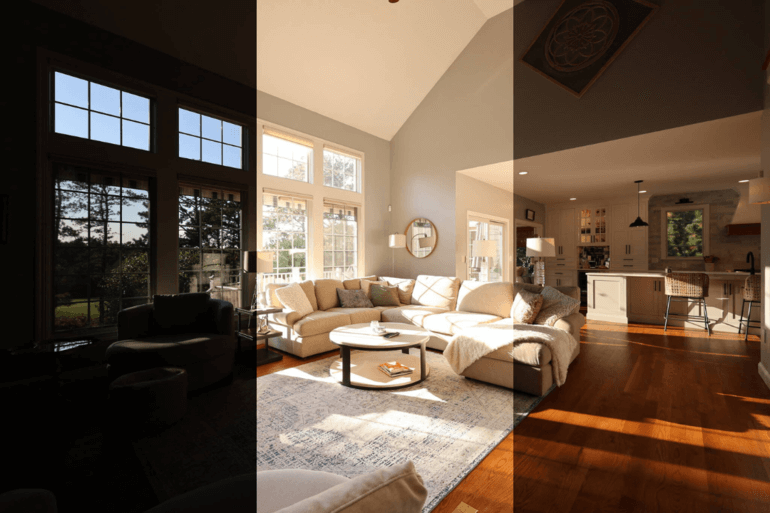
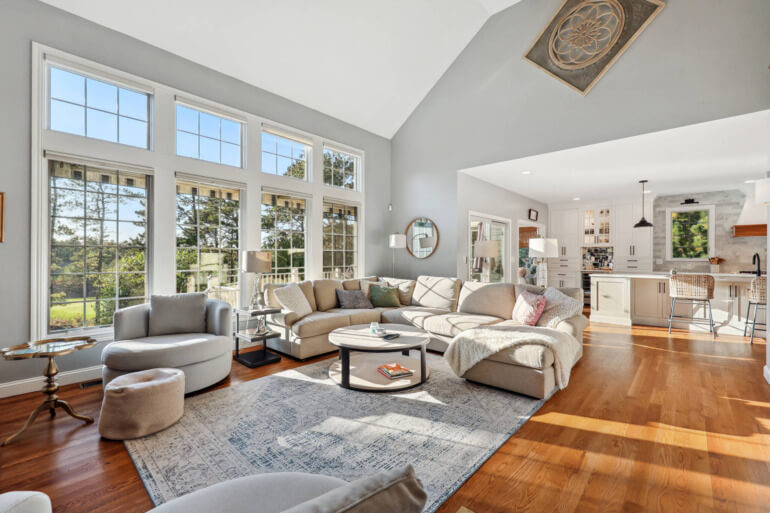
2. Correcting Exposure and White Balance


Adjusting Exposure
Luxury properties often have large windows, which can cause bright highlights and deep shadows. Start by adjusting the exposure to ensure a well-balanced image.
To learn how to do this, you can check out our tutorial about how to change exposure in Photoshop.
Utilize HDR (High Dynamic Range) techniques or manually adjust highlights and shadows to preserve details in both the brightest and darkest areas.
For more details, check out our video tutorial on how to edit HDR photos in Lightroom:
White Balance Adjustment
Proper white balance ensures that the colors in the image appear natural and true to life.
Luxury homes often feature a variety of lighting sources, from warm chandeliers to cool natural light.
Use the White Balance Tool in Lightroom or Photoshop to achieve a harmonious color tone.
To learn how to do this edit, you can watch our video tutorial on how to adjust white balance in Photoshop:
3. Perspective and Lens Correction
Luxury listings should have perfectly aligned lines to maintain a professional and polished look.
Use the Lens Correction and Transform tools in Lightroom or Photoshop to correct any distortions caused by wide-angle lenses.
This video tutorial walks you through how to do lens correction in Photoshop:
Additionally, ensuring straight vertical and horizontal lines creates a more aesthetically pleasing composition.
To learn how to do perspective correction, you can check out our video tutorial on how to straighten verticals in Photoshop:
4. Enhancing Colors and Contrast


Color Enhancement
Luxury homes often feature rich materials such as marble, hardwood, and custom finishes.
Enhance colors subtly to bring out the richness of these elements. Avoid oversaturation, as it can make the image look unrealistic.
For more details, you can visit our guide on how to color correct in Photoshop.
Adjusting Contrast
A slight increase in contrast can add depth and dimension to the image.
Use the Curves or Levels adjustment in Photoshop to fine-tune contrast while maintaining a natural look.
To learn more about the proper contrast levels, you can visit our blog post on low contrast vs high contrast for real estate photography.
5. Retouching and Object Removal


Luxury listings should be free from distractions. Use Photoshop’s Clone Stamp Tool, Healing Brush, or Content-Aware Fill to remove unwanted objects such as:
- Electrical cords
- Light switches
- Personal items
- Reflections in mirrors and glass surfaces
Additionally, ensure that surfaces are spotless and textures appear refined.
To learn how to use the Clone Stamp Tool to declutter your images, watch this tutorial video on how to remove cords in Photoshop:
Have You Ever Thought To
Outsource Photo Editing?
Try it today with 10 free edits from three professional photo editors.

6. Sky and Window Views Enhancement
Sky Replacement


A dull or overcast sky can diminish the appeal of an exterior shot. On the other hand, a nice, bright, and sunny sky can make the property look more appealing.
With a few tricks, you can replace gray, cloudy, or overcast skies with summery, sunny ones in Photoshop.
To learn how to perform this powerful edit, check out our video tutorial on how to do a sky replacement in Photoshop:
Day-to-Dusk Conversion


Editing exterior shots day-to-dusk is a fantastic way to show off a property’s lighting and create an enticing atmosphere that will draw viewers in.
This editing technique also gives a luxurious vibe to a property, which can lead to a higher sales price.
To learn how to do this elegant edit, check out our video tutorial on how to edit a day to dusk image:
Window Masking
Luxury buyers appreciate stunning views. If the outdoor scenery appears washed out, use window masking techniques to blend an exposed outdoor view with the interior.
This ensures clarity both inside and outside the home. For more information, check out our video tutorial on how to quickly & easily mask windows in Photoshop:
7. Advanced Lighting Adjustments


Adding Depth With Dodge & Burn
Dodge and Burn techniques can enhance lighting variations, making images more dynamic.
Use the Dodge Tool to brighten highlights and the Burn Tool to deepen shadows, creating a more three-dimensional effect.
Balancing Artificial and Natural Light
Luxury homes often have layered lighting designs, combining natural light with chandeliers, sconces, and recessed lighting.
Balance these light sources to prevent overly warm or cool tones. Adjust the color temperature selectively in different areas of the image.
8. Virtual Staging and Decluttering


If a luxury home is vacant or sparsely furnished, virtual staging can help potential buyers visualize the space.
With PhotoUp’s virtual staging service, you can add stylish furniture and decor that complement the home’s architectural style.
This helps potential buyers imagine themselves living in the home and see its full potential.
The cool thing is that you can choose between 11 design styles to appeal to any target audience:
- Luxury
- Modern
- Southwestern
- Mid-Century Modern
- Scandinavian
- Coastal
- Farmhouse
- American
- Industrial
- Hamptons
- Commercial
These virtual staging styles can help elevate your real estate listings and captivate potential luxury buyers.
For occupied homes, consider digitally removing excessive furniture or personal items to create a more spacious and inviting atmosphere.
9. Enhancing Outdoor Spaces


Luxury homes often feature stunning landscapes, pools, and terraces. When editing outdoor shots:
- Enhance greenery by adjusting hue and saturation
- Sharpen architectural details
- Highlight water features by enhancing reflections and clarity
- Add subtle vignetting to draw focus to key elements
In this video, for example, we’ll show how to make grass green in Photoshop to enhance the lawn:
10. Final Touches and Export Settings


Sharpening and Noise Reduction
Luxury real estate images should be crisp and clear. Use sharpening tools in Photoshop or Lightroom to enhance details while applying noise reduction to maintain smooth tones in darker areas.
This video tutorial walks you through how to easily sharpen an image in Photoshop:
Consistency Across All Images
It’s crucial to maintain a consistent editing style across all photos to ensure a cohesive look.
This includes uniform color grading, contrast, and lighting adjustments.
Optimizing for Web and Print
Export images in high resolution for print and optimized sizes for web use.
A resolution of 300 DPI is ideal for brochures and marketing materials, while 1500-2000 pixels width works well for online listings.
And there you have it! You’ve now learned how to edit real estate photos for luxury listings.
Final Thoughts
Editing real estate photos for luxury listings requires precision, attention to detail, and a deep understanding of high-end aesthetics.
By carefully adjusting exposure, color, perspective, and lighting, you can create compelling images that enhance the property’s appeal.
Whether you are showcasing grand interiors or breathtaking exteriors, mastering these editing techniques will help elevate luxury real estate photography and attract discerning buyers.
Have You Ever Thought To
Outsource Photo Editing?
Try it today with 10 free edits from three professional photo editors.
Ensure Luxury Photos With PhotoUp’s Editing Service


If you need help editing your real estate photos for the right breathtaking and luxurious feel, PhotoUp has got your back!
As a highly trusted brand, PhotoUp provides a full array of skilled, yet affordable, photo editing services for professional real estate and architectural photographers such as:
- Brightness and color correction
- Advanced object removal
- Day-to-dusk conversion and twilight editing
- Lawn greening and sky replacements
- HDR editing
- Manual blending
- Flambient editing
- Floor plans
- And much more!
PhotoUp’s team of real estate photo editors can handle any editing job — big or small, complex, or simple.
Browse Top Dedicated
Real Estate Photo Editors
Ready-to-hire editors for real estate photo editing, and more.
Why Outsource Real Estate Photo Editing?
By using a professional photo editing service, you can free yourself to focus on more important things like:
- Getting more clients
- Shooting more properties
- Replying to client inquiries
- Implementing your marketing strategies
- And simply spending more time with the people you love
Best of all, we work for you while you sleep with editors working around the clock. This will help you grow your photography business a lot faster!
The good news is that our real estate photo editing service is affordable, starting at the low cost of $1.50 per image for on-demand editing.
An Ecosystem of Real Estate Marketing Services
On top of that, PhotoUp also offers an ecosystem of real estate marketing services, including:
- Virtual staging
- Virtual tours
- Single property websites
- Floor plans
- Property flyers
- And custom house portraits
As you can see, PhotoUp has everything you need to enhance and market real estate photography in one user-friendly software.
How to Get Started
Getting started is super easy – this is what to do:
Step 1. Sign up for a free PhotoUp account.
Step 2. Upload your photos to our easy-to-use software.
Step 3. Choose the level of editing that you need and provide instructions (optional).
Step 4. Wait for PhotoUp professional editors to edit and return the photos in less than 24 hours (48 hours for virtual staging).
Step 5. Download and start using your beautifully edited photos.
PhotoUp Real Estate Photo Editing Uploader Demo
To see how easy it is to get started with PhotoUp, check out our real estate photo editing uploader demo:
It’s really that easy to get your beautifully edited photos returned to you in less than 24 hours!
Sign up for a free PhotoUp account today, and let us help you create captivating real estate photos with the right luxury feel!
For a limited time, we even offer 10 free credits you can use on any of our services when you sign up for an account.
We hope this blog post helped you learn how to edit real estate photos for luxury listings. Before you go, you may also want to check out some related resources:

